How does our personal experience impact how we read photographs?
This resource explores how we use photography to tell stories and how narratives can be shaped by individual perspectives. Through creative activities and class discussions, the resource invites students to think deeply about how they read photographs and how their interpretation might be similar or different to others depending on their lived experience and identity. It also sets out to draw on instinct and build curiosity, creativity and empathy within the classroom.
The resource supports students in:
exploring photographs in Autograph's collection
developing a deeper sense of curiosity through drawing on gut instinct
analysing photographs to determine fact vs fiction
engaging in conversations about race and representation
building empathy through listening to a range of responses and interpretations of photographs.
The resource offers a series of activities that can be used together as a lesson plan or as individual components to integrate into your own scheme of work. It is devised for Key Stages 3 to 5 (years 9 to 13) / CfE Levels 4 and senior phase students. Some of the activities could be adapted for younger students.
Art and design - Evaluate and analyse creative works - Actively engage in the creative process of art - Know about great artists and understand the historical and cultural development of their art forms - Develop and refine ideas and proposals - Develop an awareness of the purposes, intentions and functions of art, craft and design
- Develop ideas through investigations, demonstrating critical understanding of sources - Refine work by exploring ideas, selecting and experimenting with appropriate media, materials, techniques and processes - Record ideas, observations and insights relevant to intentions as work progresses - Present a personal and meaningful response that realises intentions and demonstrates an understanding of visual language
- I have experimented with a range of media and technologies to create images and objects, using my understanding of their properties (EXA 3-02a) - I can use and combine the visual elements and concepts to convey ideas, thoughts and feelings in expressive and design work (EXA 3-03a) - While working through a design process in response to a design brief, I can develop and communicate imaginative solutions (EXA 3-06a) - I can respond to the work of artists and designers by discussing my thoughts and feelings. I can give and accept constructive comments on my own and others' work (EXA 3-07a)
Level 4 - I have continued to experiment with a range of media and technologies, handling them with control and assurance to create images and objects. I can apply my understanding of the properties of media and of techniques to specific tasks (EXA 4-02a) - I can use the visual elements and concepts with sensitivity to express qualities and relationships and convey information, thoughts and feelings. I can use my skills and creativity to generate original ideas in my expressive and design work (EXA 4-03a) - Having chosen personal themes and developed my own ideas from a range of stimuli, I can express and communicate my ideas, thoughts and feelings through 2D and 3D work (EXA 4-05a) - I can analyse art and design techniques, processes and concepts, make informed judgements and express considered opinions on my own and others' work (EXA 4-07a)
Art and design - Students use their knowledge about the work of other artists to enrich and inform their work through analysis and evaluation. - Students use a variety of processes. - Students evaluate their work through discussion. - Students explore, experiment with and apply the visual, tactile and sensory language of art.
Exploring the expressive arts is essential to developing artistic skills and knowledge and it enables learners to become curious and creative individuals.
Progression step 4:
I can explore and experiment with my own and others’ creative ideas, demonstrating increasingly complex technical control, innovation, independent thinking and originality to develop my work with confidence, being able to explain my reasons behind choices made and evaluate their effectiveness on my creative work
I can explore creative work, understanding the personal, social, cultural and historical context, including the conventions of the period in which it was created.
I can investigate and understand how meaning is communicated through the ideas of other artists.
Progression step 5:
I can explore and experiment with my own creative ideas and those of others, demonstrating technical control, innovation, independent thinking and originality, showing confidence to take risks and developing resilience in order to overcome creative challenges.
I can investigate and analyse how creative work is used to represent and celebrate personal, social and cultural identities.
I can independently research the purpose and meaning of a wide range of creative work and consider how they can impact on different audiences.
Responding and reflecting, both as artist and audience, is a fundamental part of learning in the expressive arts.
Progression step 4:
I can effectively evaluate my own creative work and that of others showing increasing confidence to recognise and articulate strengths, and to demonstrate resilience and determination to improve.
I can apply knowledge and understanding of context when evaluating my own creative work and creative work by other people and from other places and times.
I can evaluate the effectiveness of a wide range of artistic techniques in producing meaning.
Progression step 5:
I can critically and thoughtfully respond to and analyse the opinion and creative influences of others in order to independently shape and develop my own creative work.
I can purposefully apply knowledge and understanding of context when evaluating my own creative work and creative work by other people and from other places and times.
I can critically evaluate the way artists use discipline-specific skills and techniques to create and communicate ideas.
Creating combines skills and knowledge, drawing on the senses, inspiration and imagination.
Progression step 4:
I can use my experimentation and investigation to manipulate creative work with purpose and intent when communicating my ideas.
I can apply specialised technical skills in my creative work.
I can purposefully use my design skills and apply a range of solutions to clarify and refine final creative ideas.
I can draw upon my experiences and knowledge to inform and develop strategies to overcome creative challenges with imagination and resilience.
Progression step 5:
I can synthesise and apply experience, knowledge and understanding with sophistication and intent when communicating my ideas.
I can use professionally established, discipline-specific techniques confidently and convincingly in my creative work and work towards industry standards.
I can design creative outcomes to professional and industry standards with sophistication, clear purpose and intent.
I can use effective strategies to take risks with my own creative work and can display resilience to overcome creative challenges.
I can evaluate and judge the appropriateness of my creative work in relation to ethical and legal considerations and its effect on participants and audiences.
Resource background
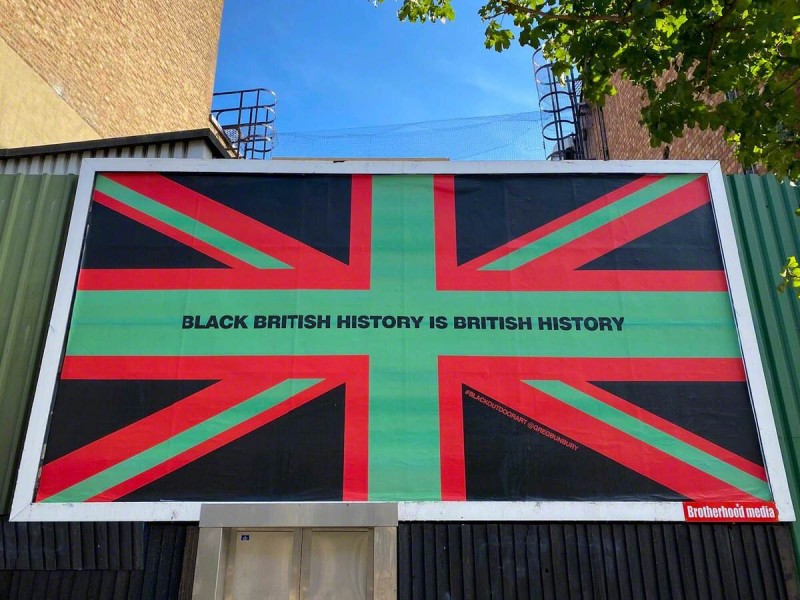
This resource is a collaboration with Autograph ABP and draws on Autograph's unique photographic collection. It aims to engage students with conversations around race, representation, photography and visual literacy, and support teachers to teach diverse curricula effectively and confidently.
The activities included in the resource were developed from co-development sessions that Autograph organised with artists and teachers.
Collectively the artists explored how photographs from Autograph's collection could be used to respond to issues facing young people in the education system today. These activities were then trialled and tested in partnering schools.
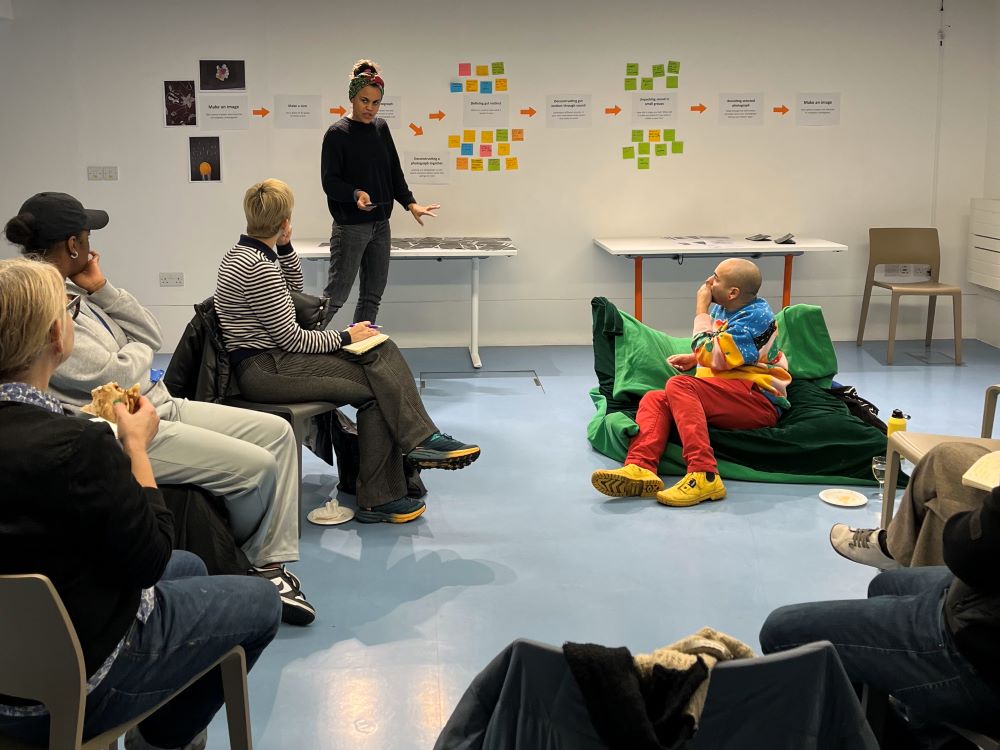
Co-development session with artist Ella Phillips
This resource was developed with artists Daniel Regan and Ella Phillips in partnership with Eastbrook School, Halley House School, Randal Cremer Primary School, Riverely Primary, Stoke Newington School and Thomas Tallis School, with support from Art UK and Art Fund.
Before you start, create an environment that nurtures collective listening and curiosity.
Autograph workshop in a classroom
How is your classroom laid out? Ensure that students can see each other and work in small groups easily. Try moving tables together or sitting students in small circles.
Interrogate the teacher-student dynamic. Be transparent with students that questions might arise in the session that you as the teacher are unsure how to answer. Sometimes questions can lead to more questions and that is ok. This approach should encourage students to investigate the conversation further after the session. Whilst doing the making activities, refer to the students as artists – your role is to support their creativity.
Give permission to make mistakes. For students to feel empowered to explore and develop their storytelling skills, make it clear that these activities are a space where to be right or wrong is subjective. Reinforce that much can be gained through trusting the process.
Activities
The resource is arranged into four sections. The activities in the first three sections can be selected and adapted depending on your curriculum and classroom setup.
Top tip: For effective delivery of the resource, we recommend that you pick something from each section.
Begin the session with a playful, practical activity that gets students moving and doing – and 'in the zone' for thinking creatively.
These activities will encourage students to focus on the process rather than being only concerned with the final outcome. Choose one or two activities that you feel would work best with your students.
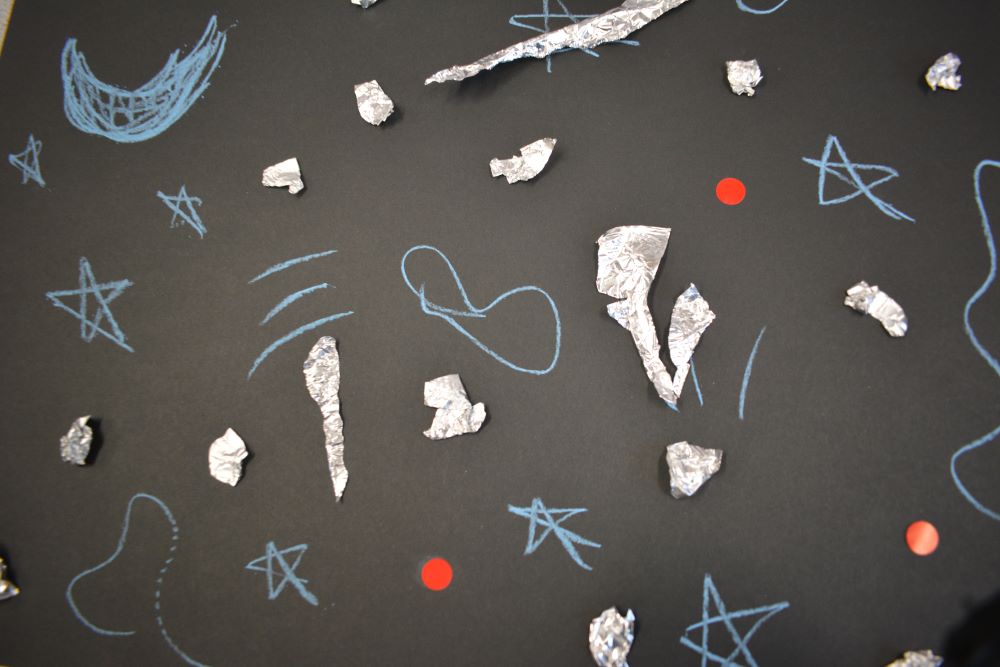
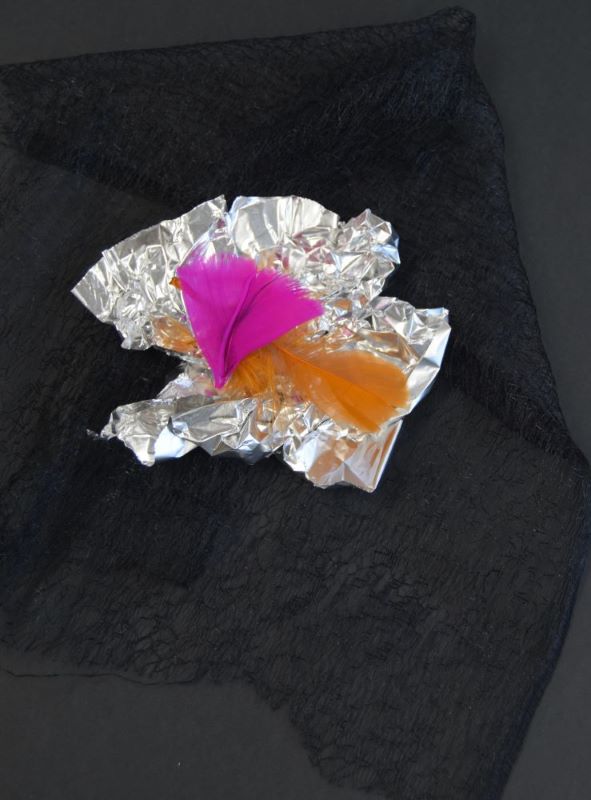
Compose and make a photograph
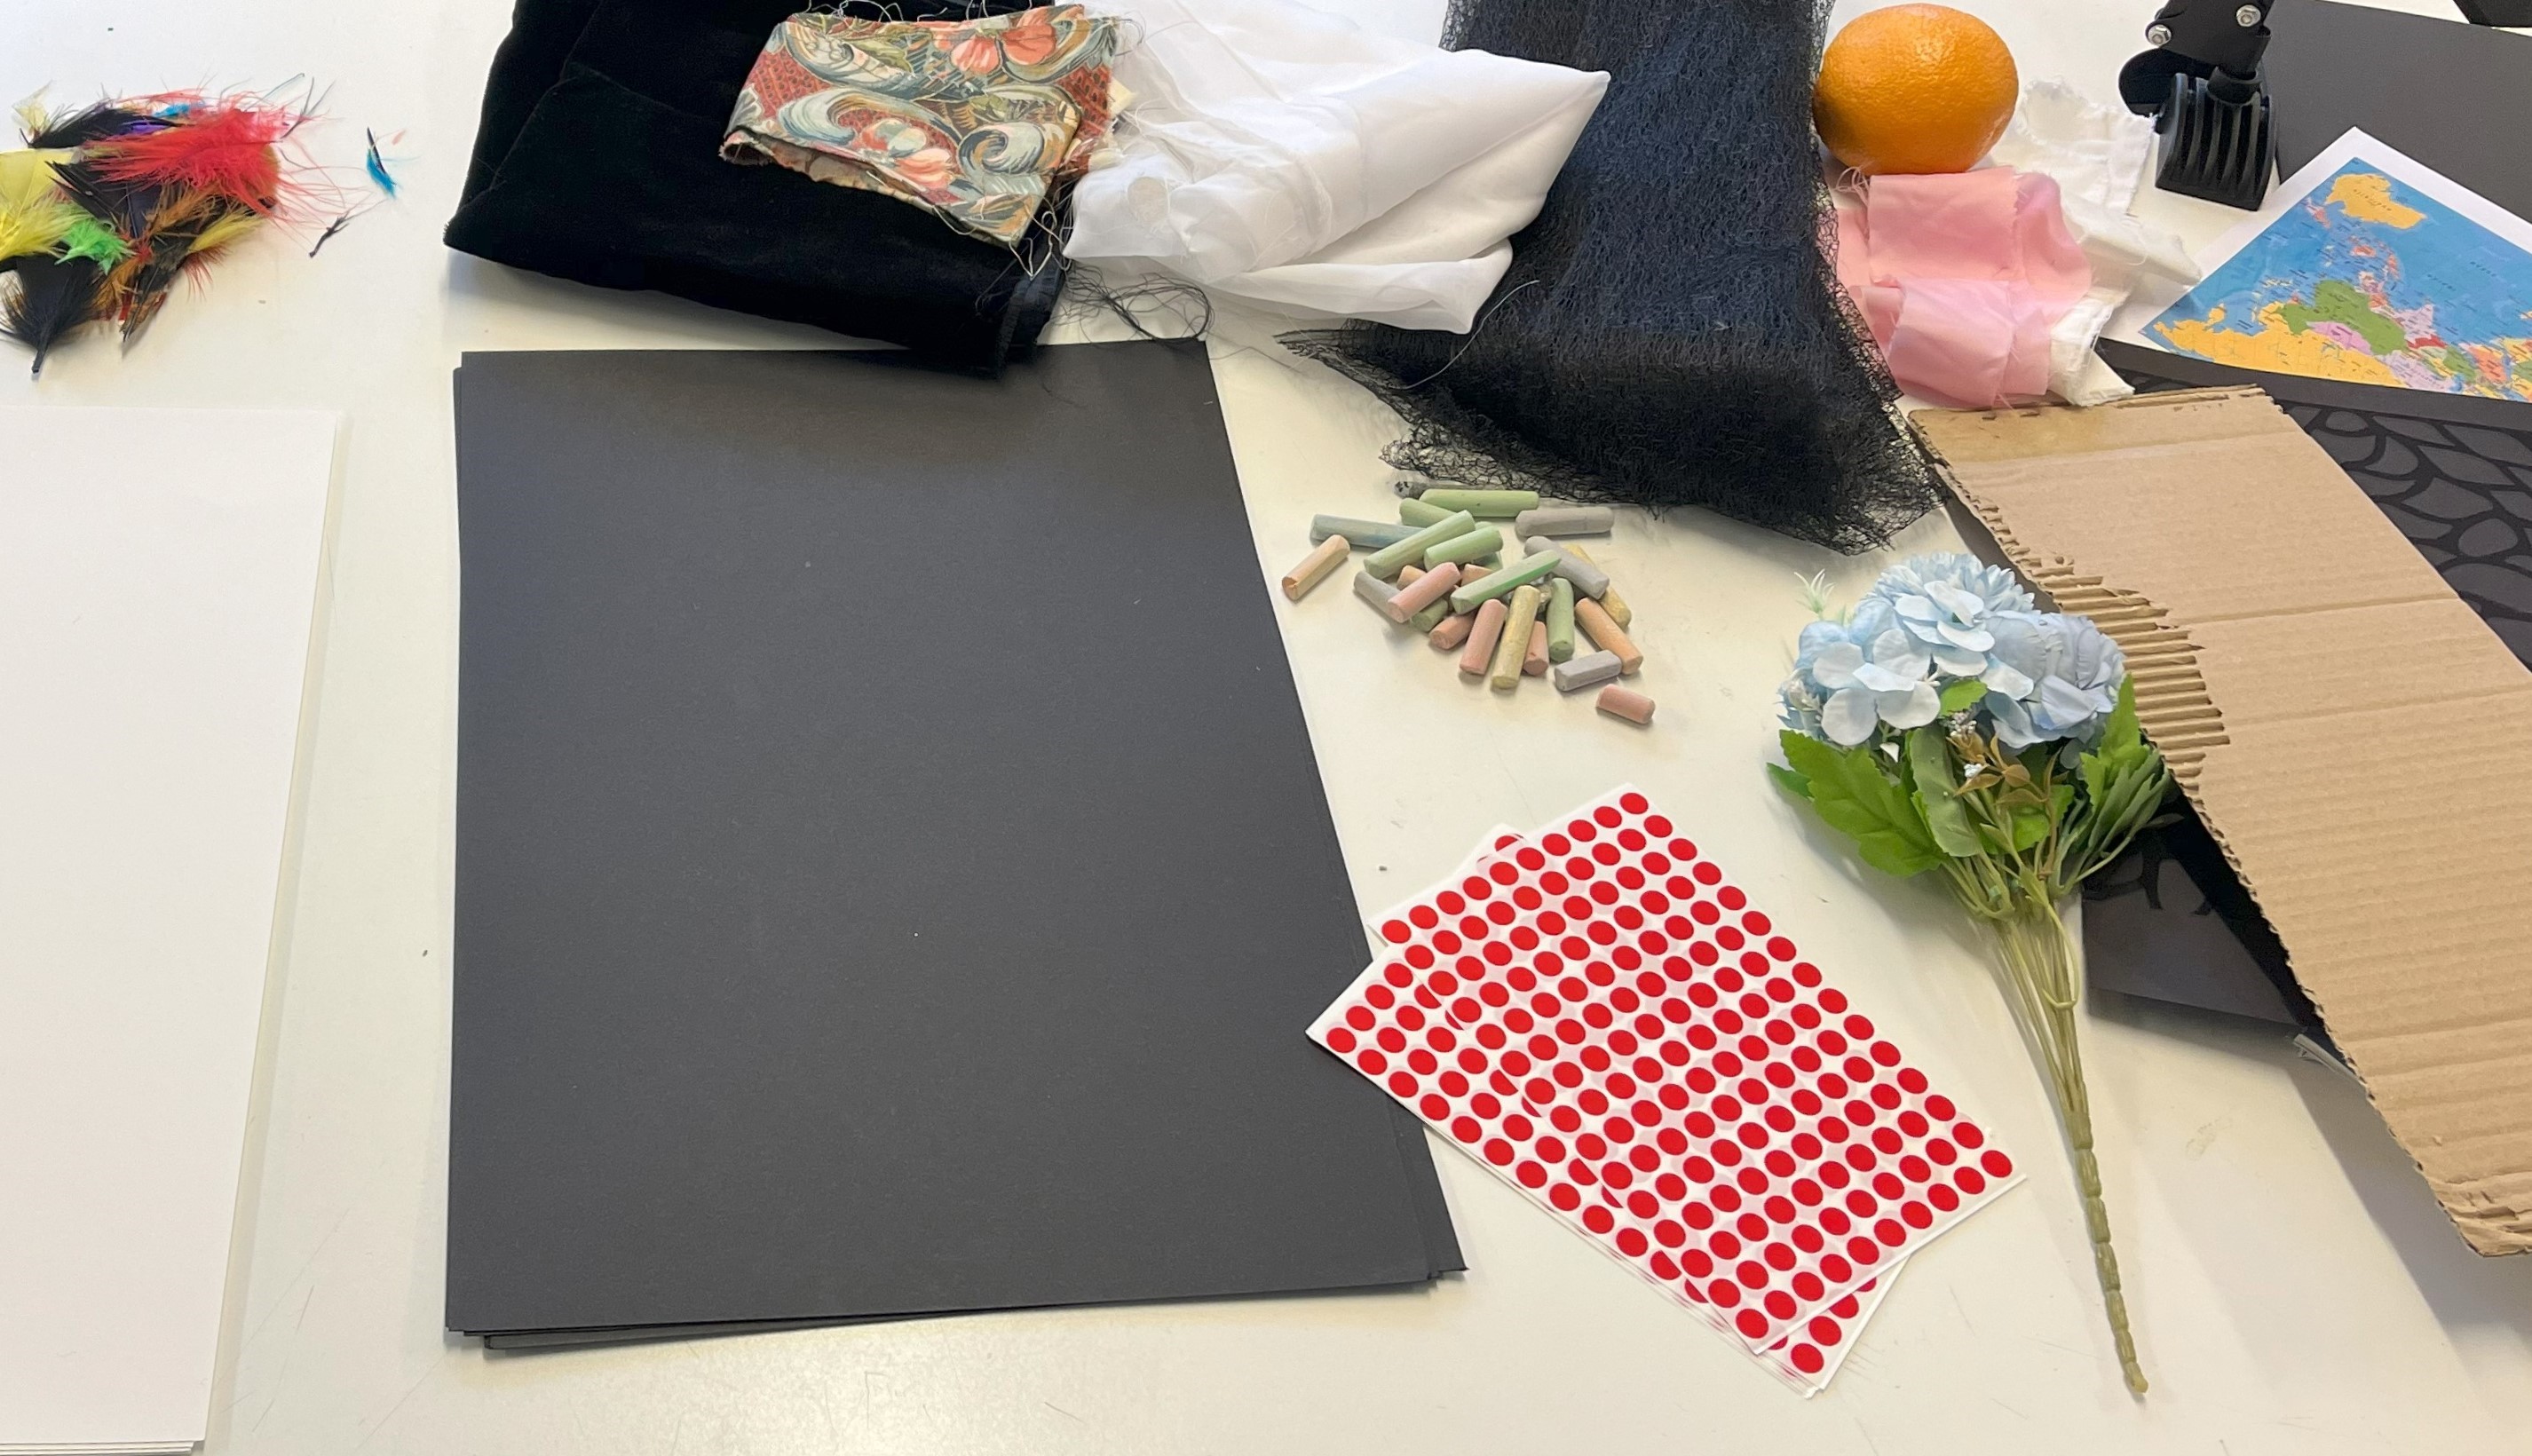
Time: 5–15 minutes (you may need to allow more time depending on the age and ability of your class) Materials: A3 black and white card, foil, feather, scraps of fabric, leaves, stickers, chalk, random small objects, magazines, maps, scissors, glue, tape, cameras Working: independently
1. Lay out a range of materials and objects at the front of the class alongside sheets of A3 black and white card. The materials and objects can be completely random but need to be able to fit on the card.
Activity materials
2. The students have 5 minutes to use the objects to create a composition to photograph. They are allowed to select up to 3 materials and either a black or white piece of card as the backdrop.
Composing materials for a photograph
3. After 5 minutes is up, get each student to photograph what they have created.
A photograph of arranged objects
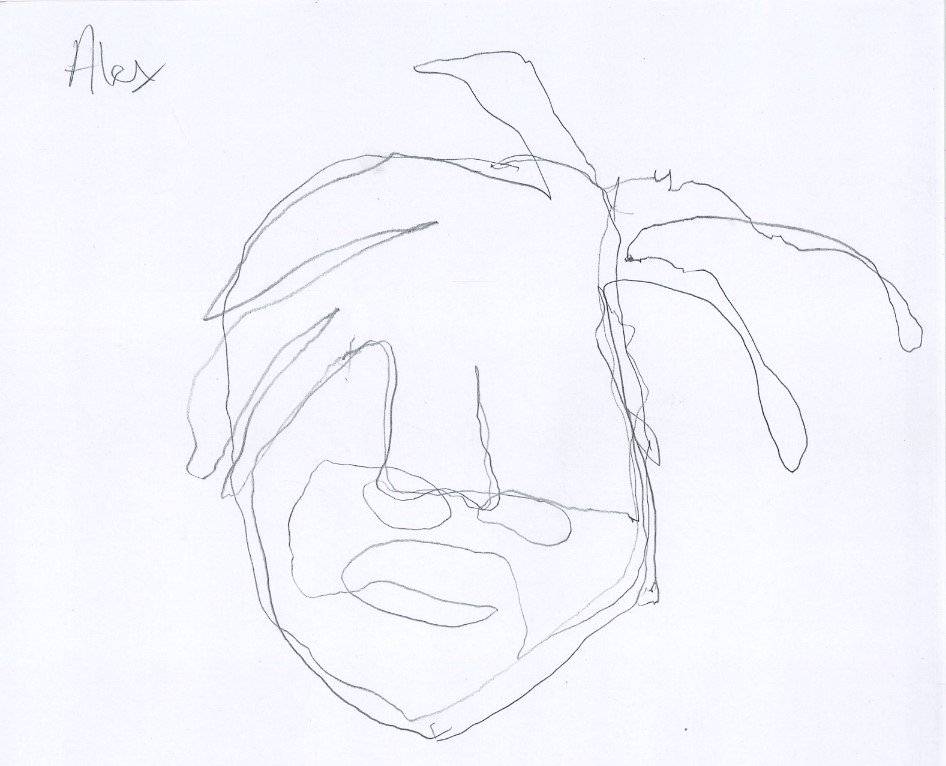
Speedy portrait drawing and looking closely
Time: 10–15 minutes Materials: A4 paper, pencils, clipboards or something to lean on Working: in pairs
Organise students into pairs. They should be facing one another with a plain piece of paper and a pencil each.
1. Continuous drawing
For the first portrait, allow students 2 minutes to draw their partner.
They must look at their partner the whole time and are not allowed to look down at the paper.
The pencil must be touching the paper for the entirety of the time they are drawing.
After 2 minutes the students can reveal their drawings to their partners.
Allow a moment for them to compare and contrast.
Two-minute continuous portrait drawing
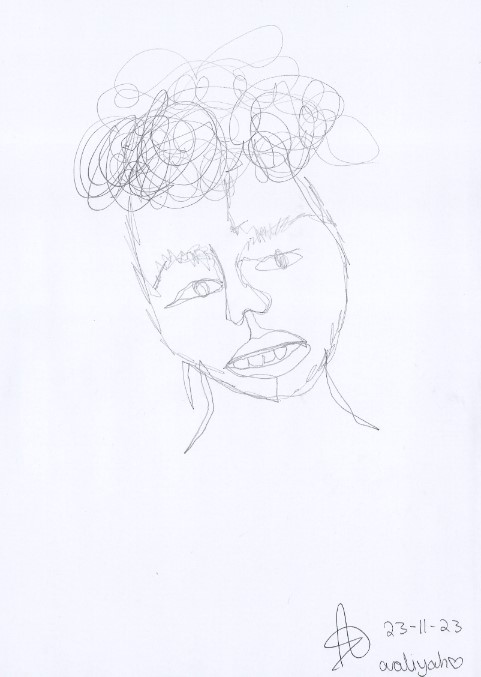
2. Slower response drawing
Ask students to turn their paper over and work on the back of their continuous drawing. This time, students will have 4 minutes to draw their partner.
They must look at their partner the whole time and are not allowed to look down at the paper.
They are allowed to take their pencil off the paper this time.
This response is aiming for more detail and closer observation.
Exchange drawings. Get each drawer to sign the portrait and gift it to their sitter.
Four-minute, slower response portrait drawing
Describe what you see
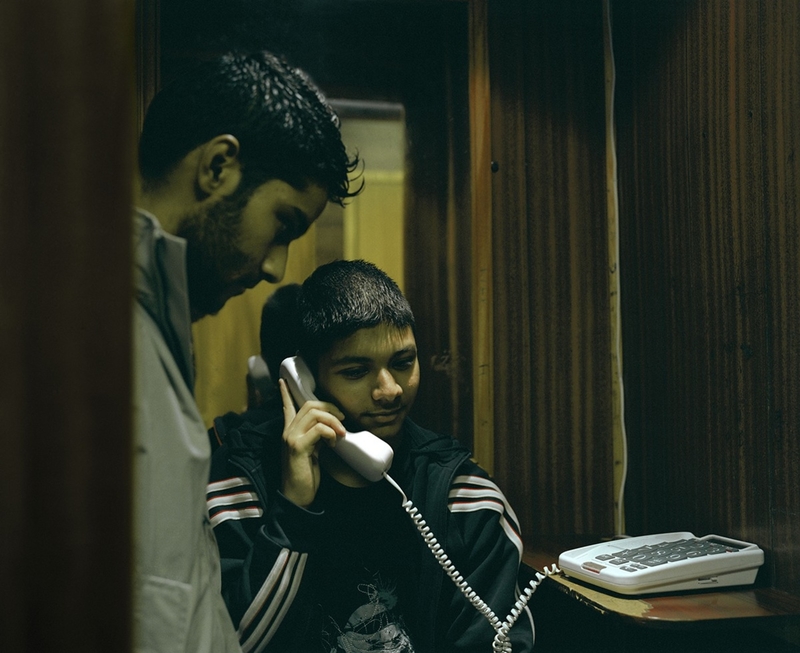
Time: 10–15 minutes Materials: A4 paper, pencils, blindfolds, 2 x photographs from Autograph's collection, projector Working: in pairs
1. Organise the students into pairs. One student will be the describer and the other will be the drawer. The drawer should be blindfolded and have a piece of plain paper and a pencil.
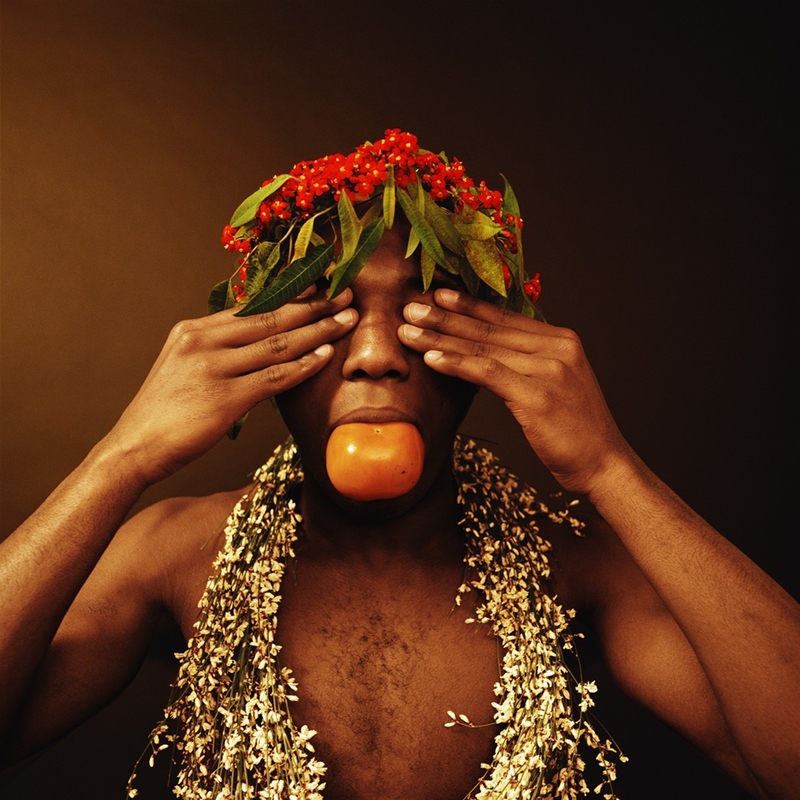
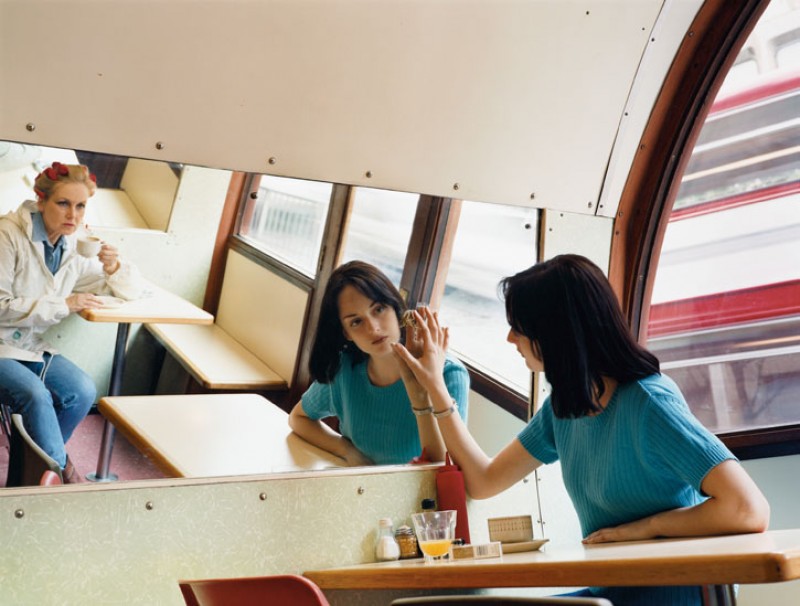
2. Display a photograph from Autograph's collection on the screen and ask the describer student to describe it. Use the photograph below or choose another one from the collection.
3. The describer has 3 minutes to explain what they see to the drawer. Encourage the describer to think about the different elements of the photograph including the depth, composition, texture, shapes and mood of the photograph. It might help to ask them to consider:
what section of the photograph will you choose to start with?
what are the main elements and leading lines of the photograph?
4. After 3 minutes the drawers can put their pencils down and remove the blindfolds. In pairs or as a class discuss the following questions:
As the drawer, do you feel your partner gave an accurate description of the photograph? What did the describer do well? What could they have been better at? Are there any elements of the photograph that are missing in the drawing?
As the describer, what were you first drawn to describing? Why do you think that is?
5. Now ask each pair to swap their roles. The describer becomes the drawer with the blindfold, paper and pencil and the drawer becomes the describer.
6. Display another photograph from the Autograph's collection on the screen and give the pairs another 3 minutes to describe and draw the photograph. Use the photograph below or choose another one from the collection.
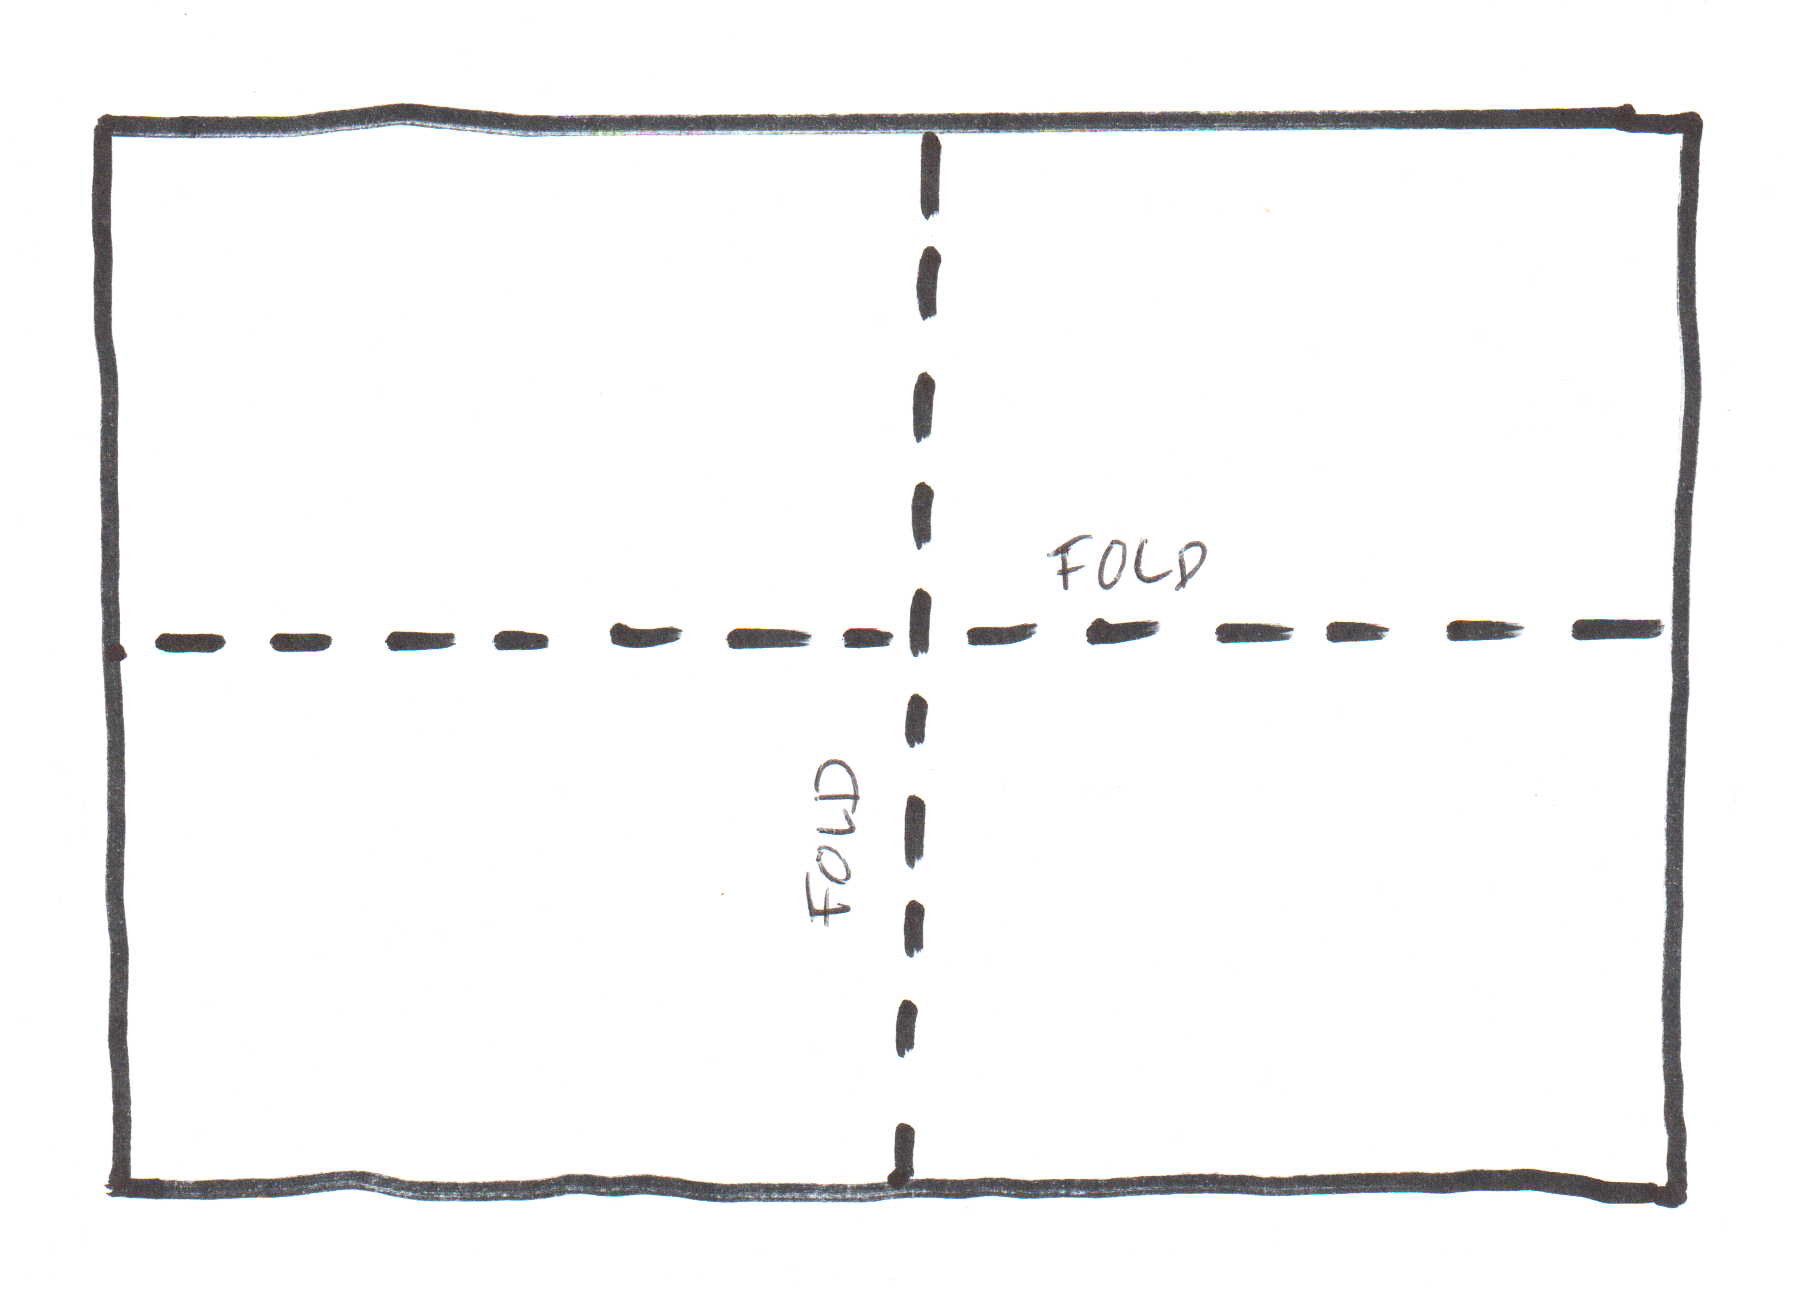
1. Give each student a piece of A3 paper. The zines are most effective with black paper but any will do.
2. Ask students to fold the paper in half horizontally and vertically so a cross is created when folded back out.
Fold the paper horizontally and then vertically
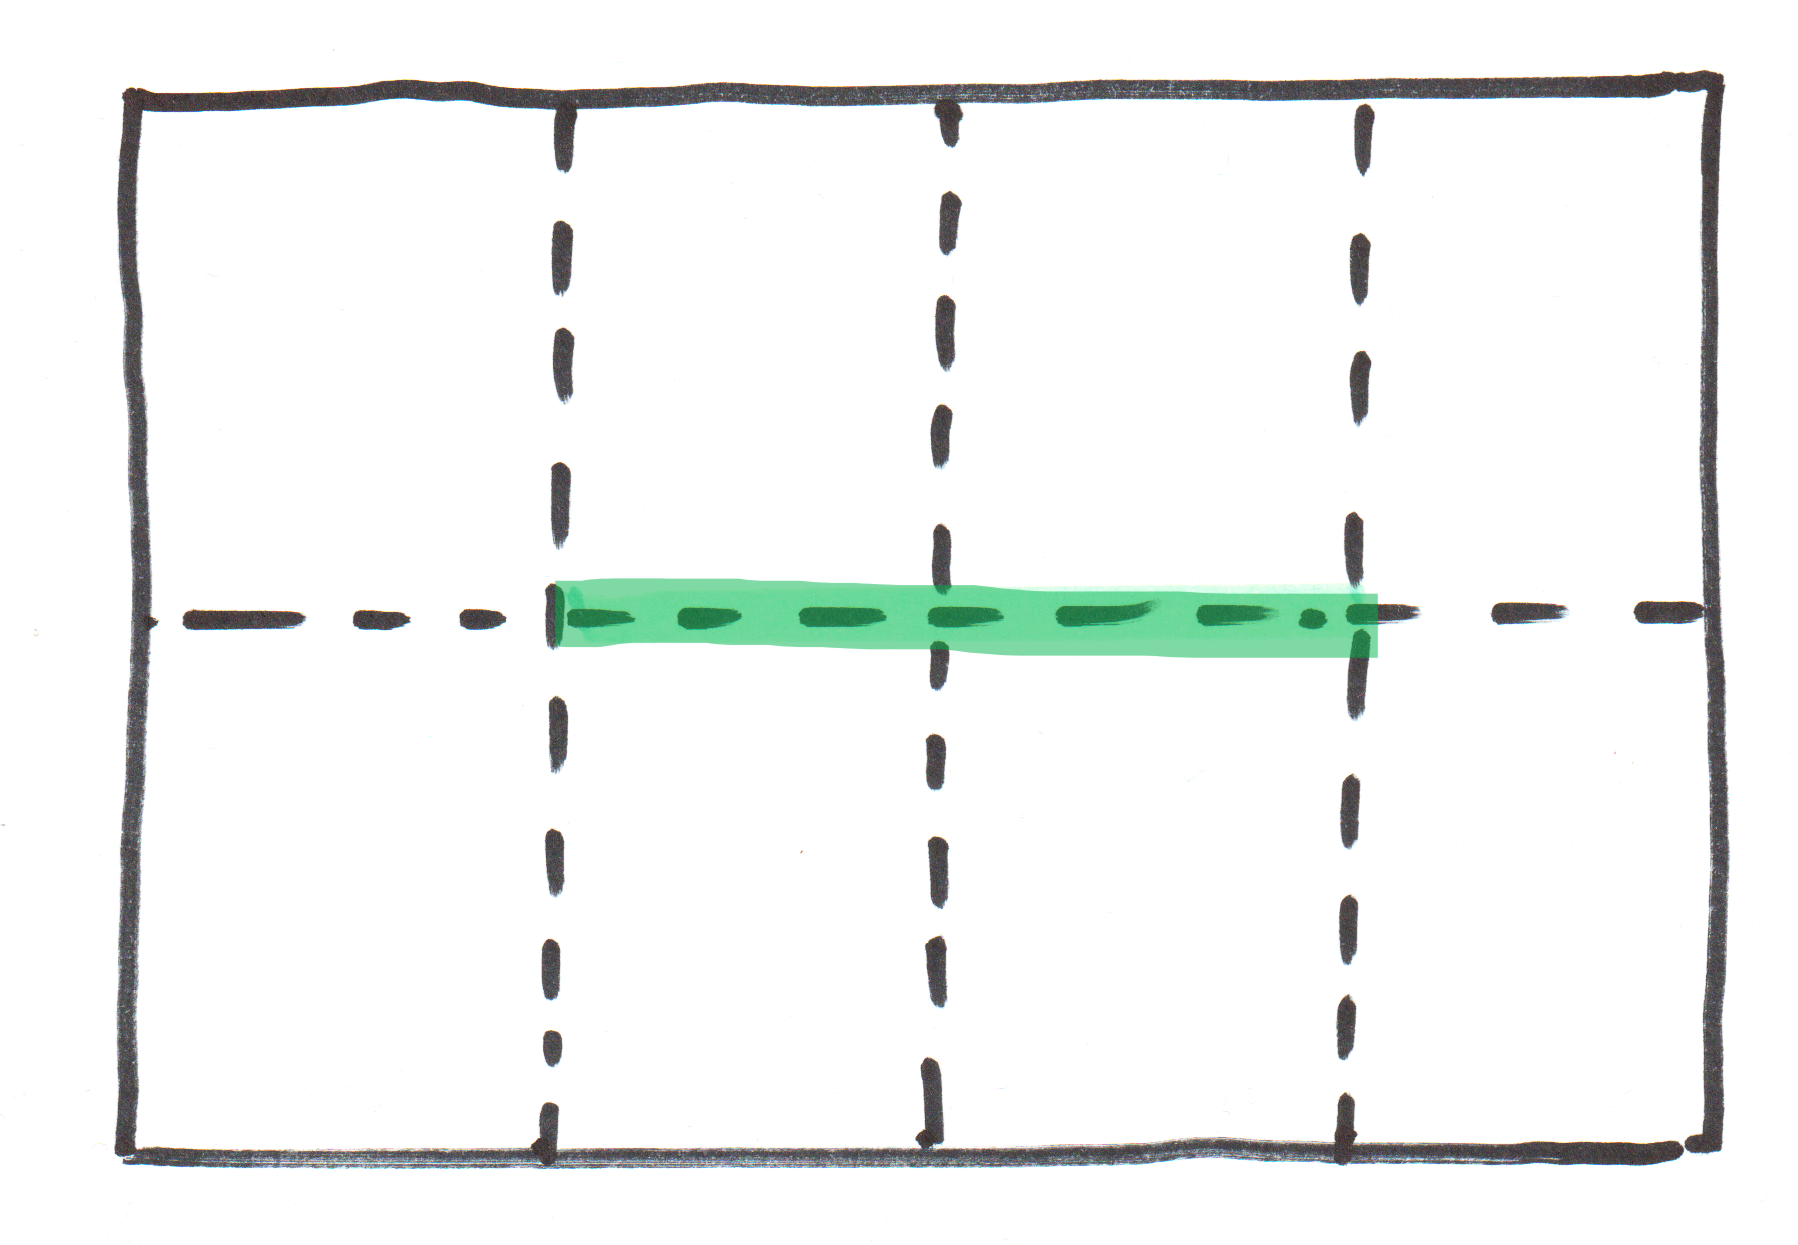
3. With the paper in landscape (horizontal) orientation, get the students to make another two folds, folding each side inwards to meet the middle of the page. When it is folded back out there will be eight rectangles created.
Fold again with the paper in horizontal format
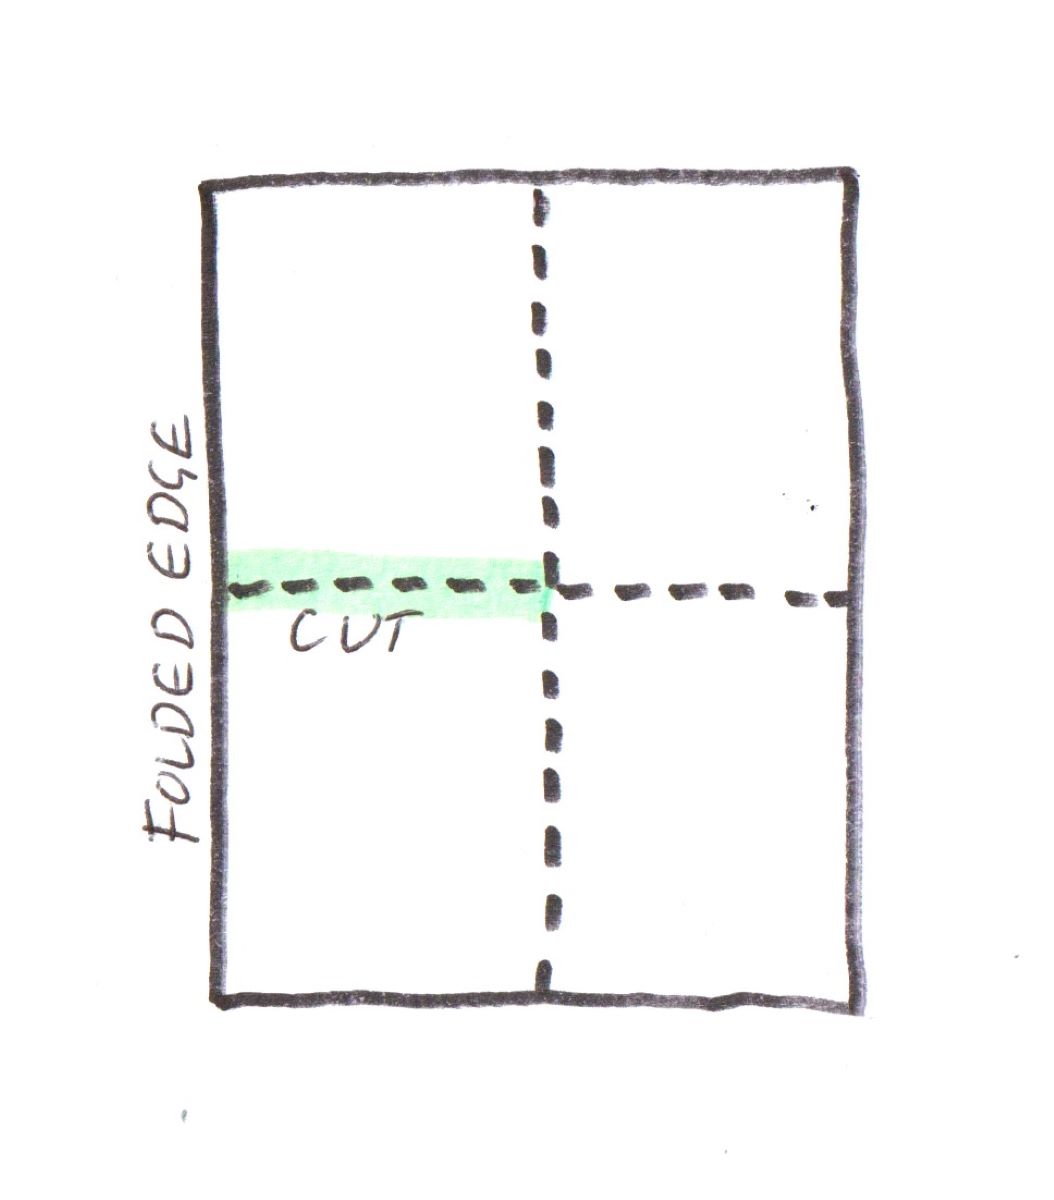
4. Now, the students need to cut down the centre two lines of the paper so a slit is made.
Cut the centre two lines to make a slit
The simplest way to do this is to fold the paper in half and cut down the centre line from the folded edge.
Fold and cut the paper
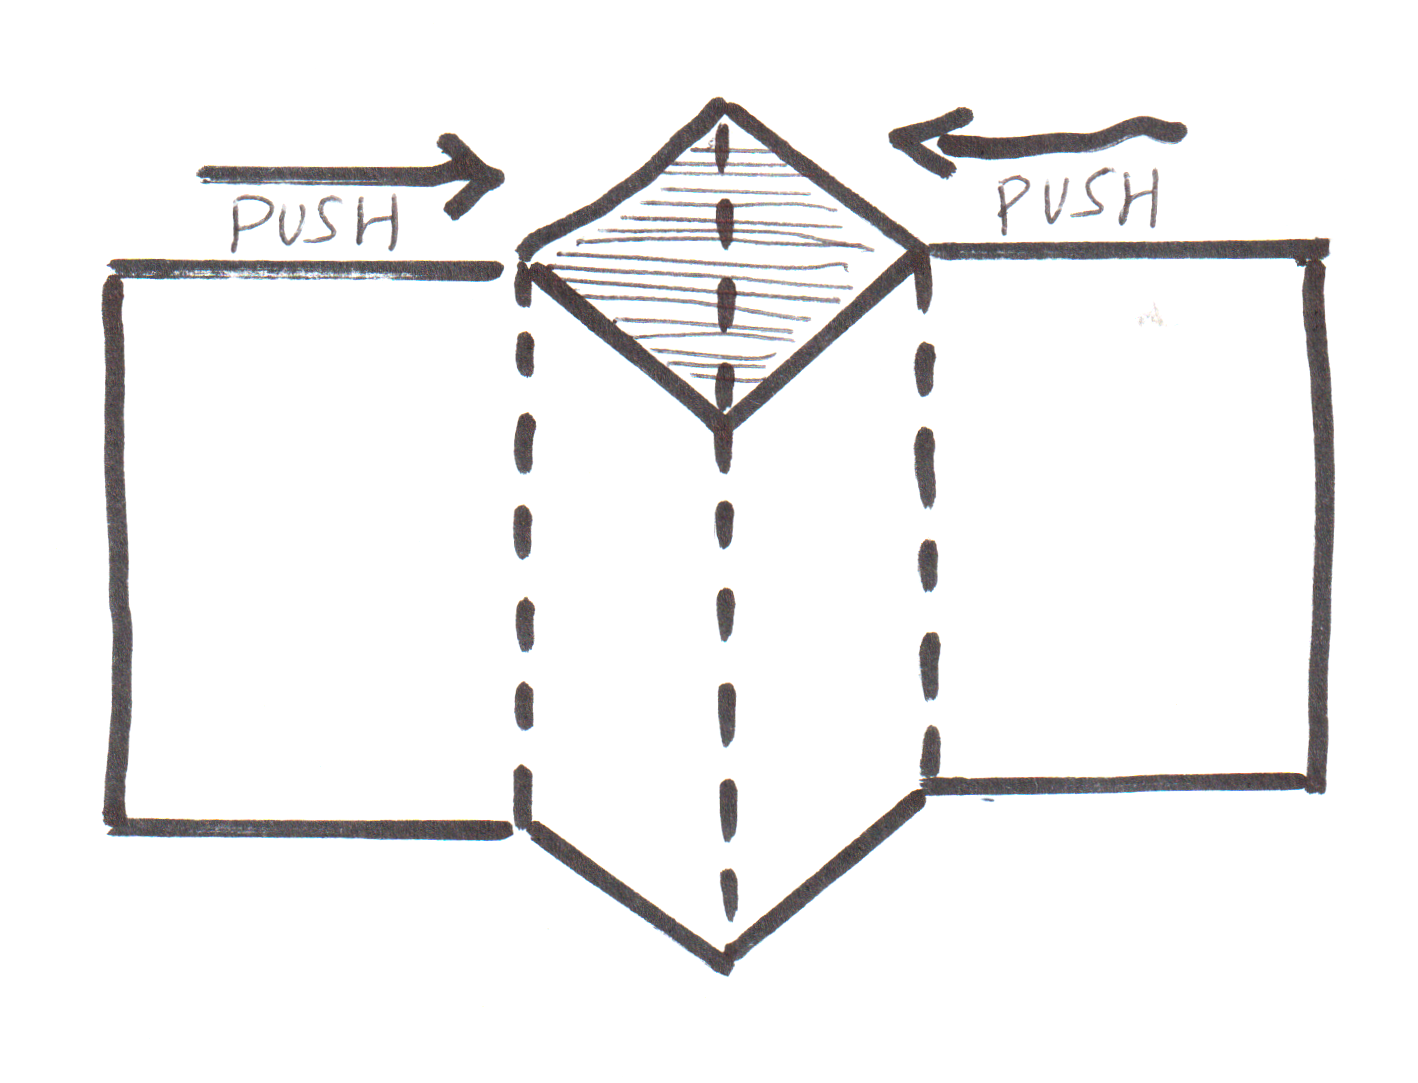
5. This is the fiddliest bit. Make sure your students begin with the paper fully folded back out to full A3. Fold the paper in half, with the cut at the top.
Paper folded with the cut at the top
Holding on to both edges, push the cut open into a diamond shape.
Push paper make a diamond shape
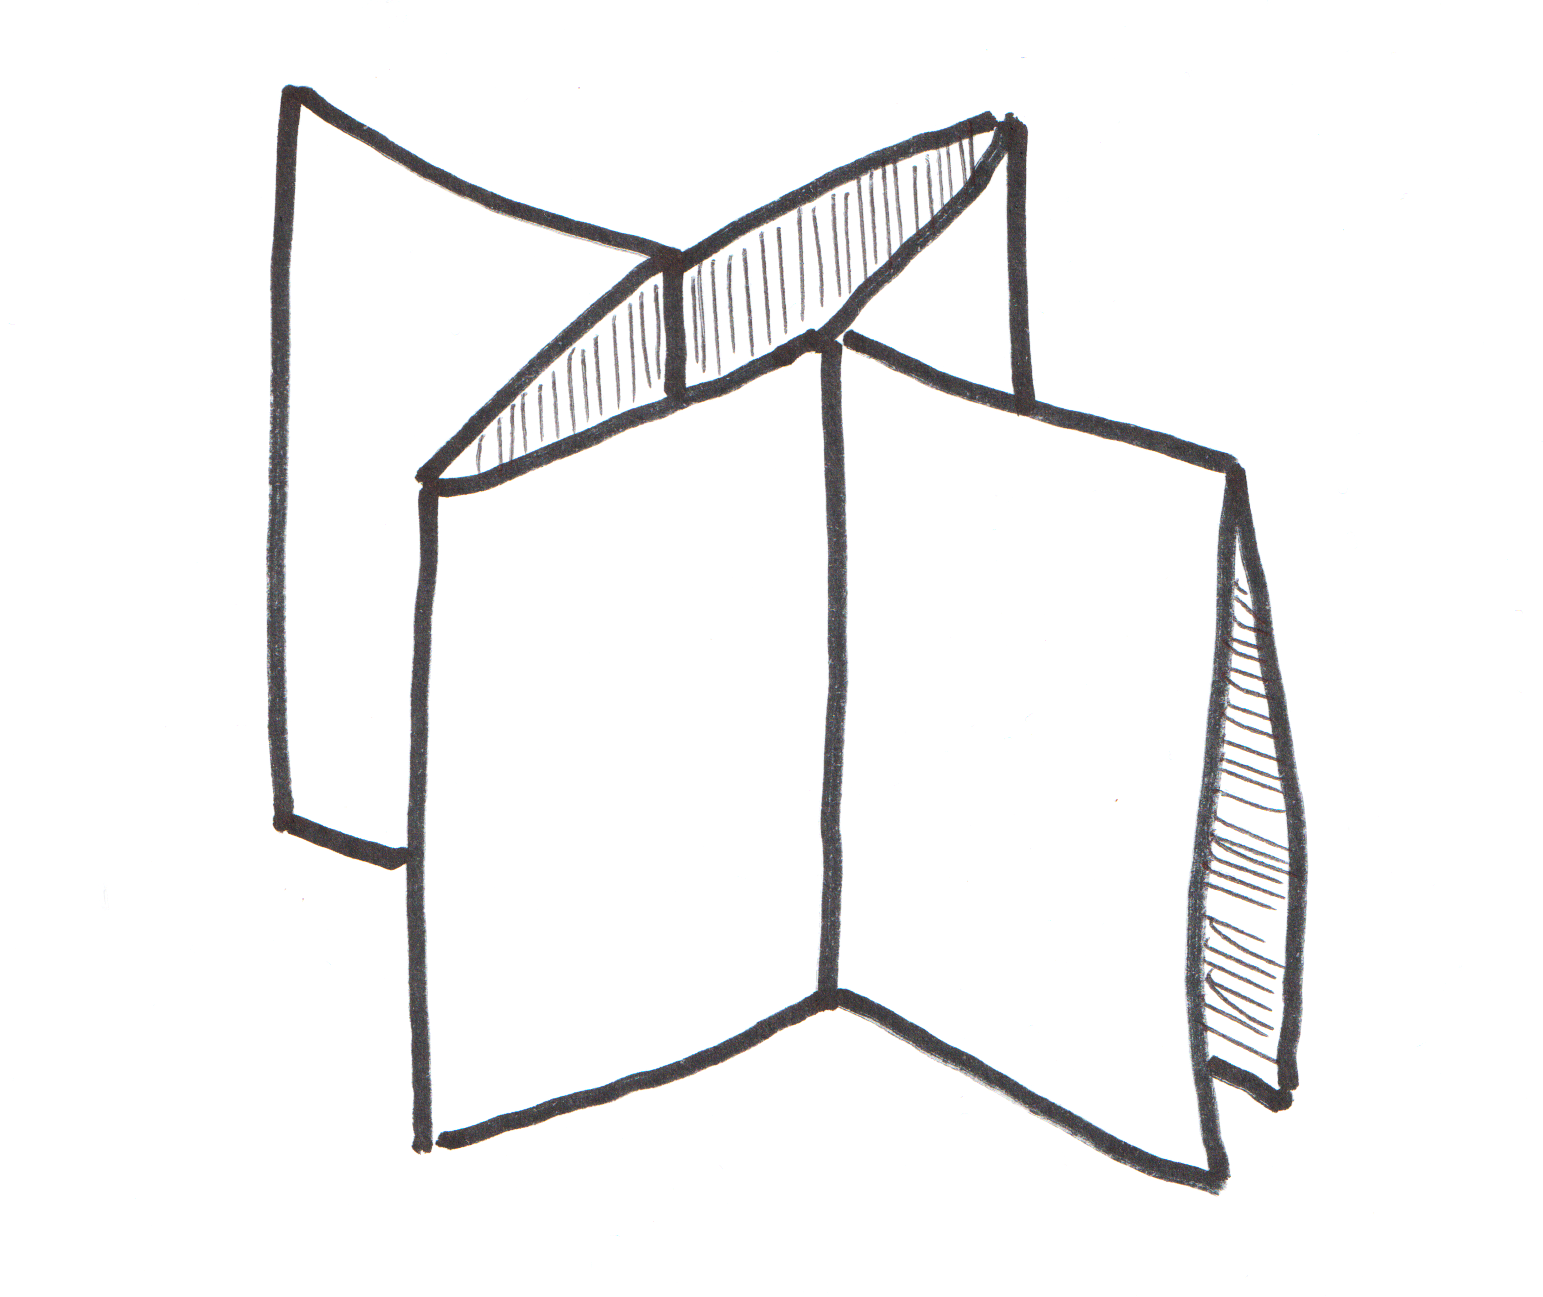
Then fold the zine in on itself ...
Fold the zine in to create pages
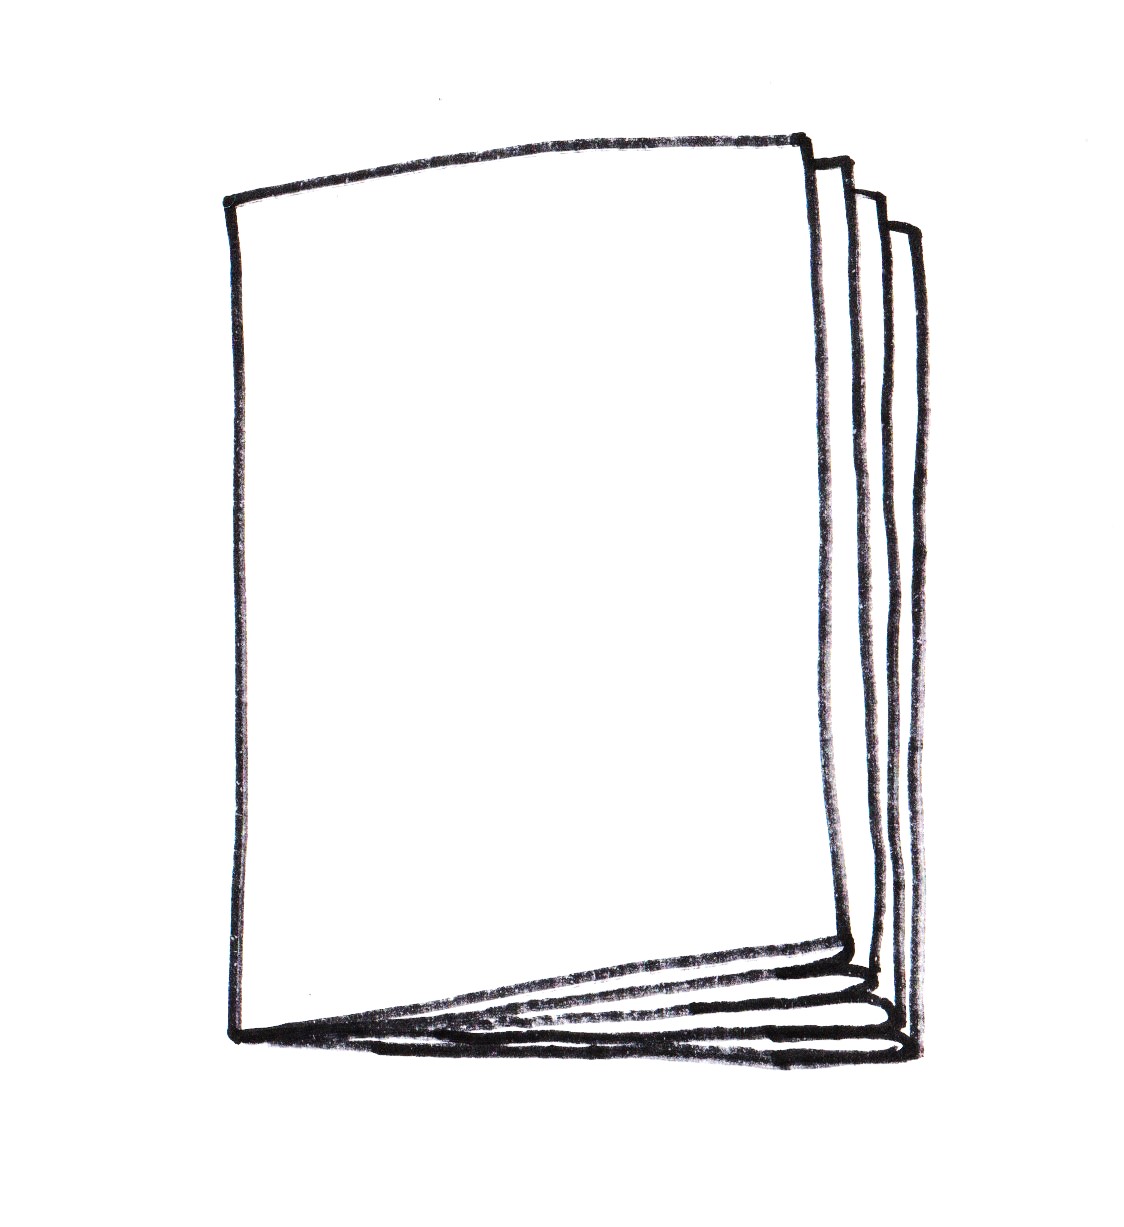
... and flatten to make a book shape.
Flatten to make a book shape
The zine can now be used for activities further along in the resource.
Time: 15 minutes Materials: printouts of Autograph's archive collection, scissors, paper, glue, optional: the zine they have made
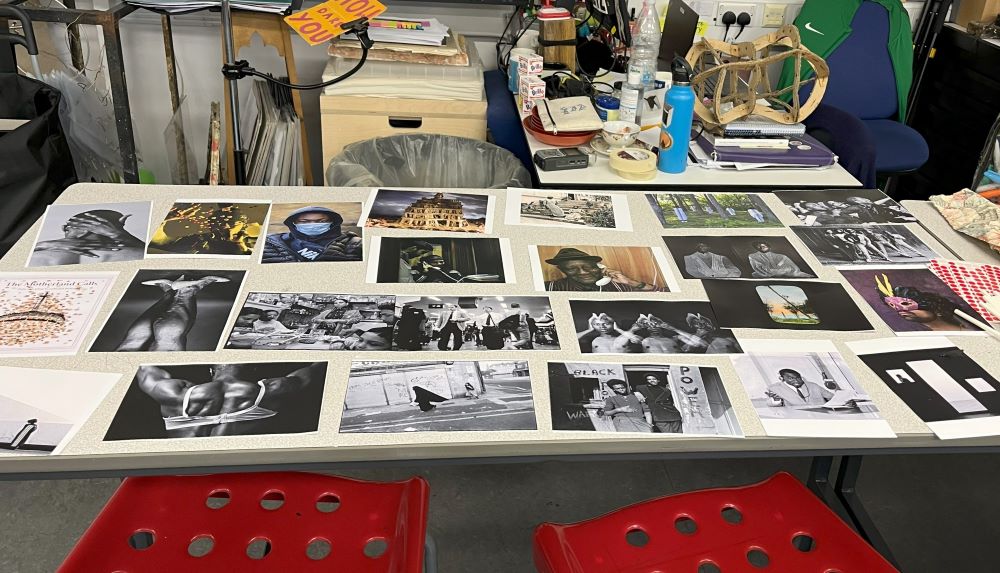
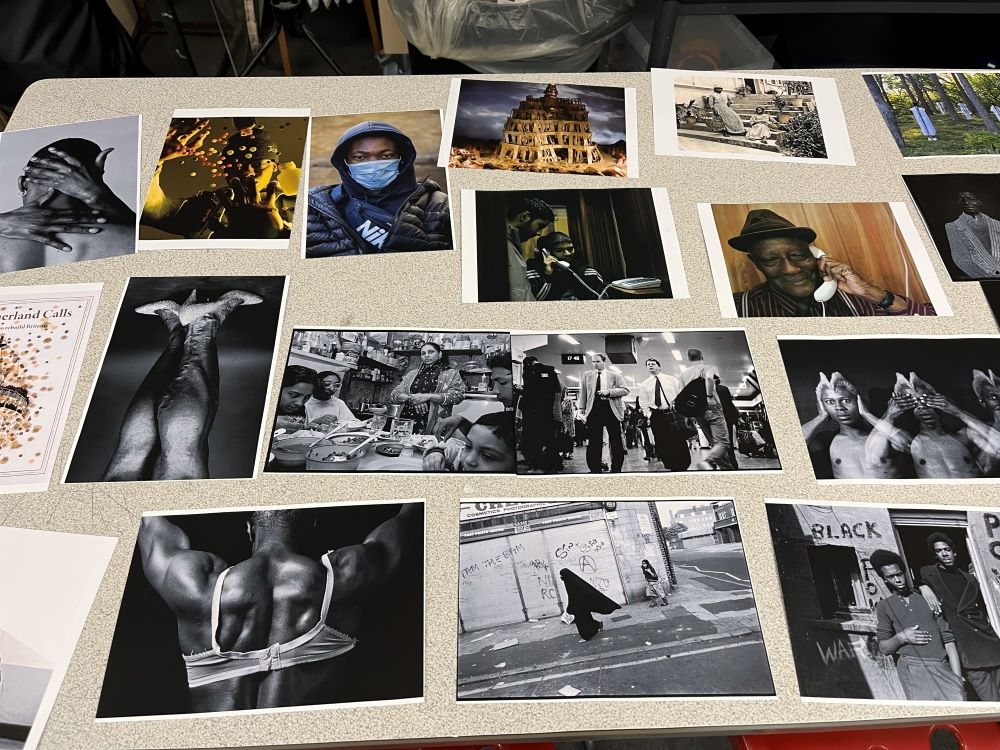
1. Lay out photographs from Autograph's collection onto a table and invite students to pick a photograph that they are drawn to. (A selection of photographs is included in the carousel below, but you could also choose your own.)
Selection of photographs from Autograph's collection
2. Once everyone has selected a photograph, ask students to look at the photograph consistently for 1 minute.
3. After the minute is up, instruct the class to crop the photograph using scissors to create a new image. The way they do this is entirely up to them.
4. They could stick the new version onto the front page of their zine, or a piece of paper.
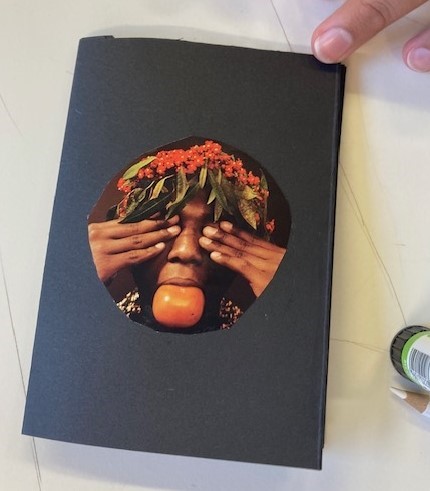
A cropped photograph
Explore curiosity and gut instinct
A central objective of this resource is to develop a deeper sense of curiosity through drawing on gut instinct.
The activities below encourage students to think about and define what being curious and having gut instinct means, and then test out these notions through listening to sounds and looking at photographs from Autograph's collection.
Class discussion: What does it mean to be curious?
Time: 10 minutes Materials: no materials are needed Working: as a class
As a class, discuss:
What does it mean to be curious?
What can we learn from it?
Why is it good to be curious?
Is being curious ever a bad thing?
Explain that to be curious is to have a desire to find something new. In the context of this resource, it could also be about being open to hearing other people's opinions and engaging in positive debate.
Ask the class 'What does gut instinct mean to you?'
Ask students to write down their answers on a Post-it note.
Stick their responses on a board at the front of the class and then read out, or ask a student to read out, the responses.
Explain that gut instinct is the wisdom based on our life experiences and memories since the moment we start existing that we cannot necessarily recall. Today we are going to foster that prior knowledge and experience to fill the gaps in the photographs we will look at. Everyone has an inner wisdom to draw on.
Now ask the class, 'Can using gut instinct ever be a bad thing?'
Explain that sometimes our initial reaction needs to be interrogated because it could lead to stereotyping people incorrectly. This is called unconscious bias.
Student activity: Responding to sound
Time: 15–20 minutes Materials: audio soundbites, speakers, pencils, paper or zines Working: independently and in pairs
Below is a list of different sounds that connect to photographs in Autograph's collection. Invite students to respond to sounds using their gut instinct.
1. Select 5 soundbites from the list above.
If you are working with specific photographs from Autograph's collection, try and choose sounds that feel most relevant to those photographs. (We have included an artist's name with each soundbite to provide a suggestion for photographs you could explore, but feel free to match a soundbite with an alternative photograph.)
3. Ask students to write down three words that come into their mind whilst listening to the sounds.
Encourage students to think about:
How does the sound make you feel? (Physical: heart rate, breathing, muscles, skin).
What does it make you think of? (Psychological: memories, likes/dislikes, hopes/fears).
How does the sound relate to your life? (Political: how might the sounds relate to backgrounds, beliefs, culture).
If the class made zines in section 2, they could write down their response to each sound on a page of the zine.
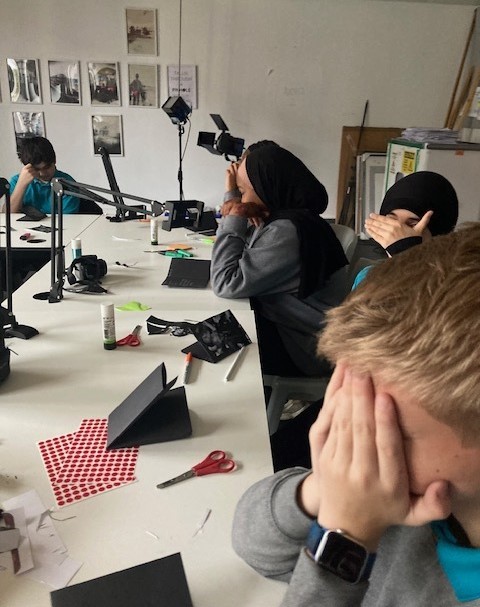
4. Turn off the lights and get the students to close their eyes so that their hearing is heightened.
Students listening to sounds with their eyes closed
Top tip: This activity is most effective when the sound fills the whole room. If possible, connect the device to built-in speakers for an immersive experience. Be sure to keep the computer screen hidden so the title of the sound is not revealed to the class.
5. After the students have written down their responses to each sound, invite them to compare and contrast these with the person next to them.
6. Repeat for each soundbite but ensure they discuss their responses with a different student by getting them to move around the room.
Student activity: How does this photograph make you feel?
Time: 10 minutes Materials: A4 printouts of photographs from Autograph's collection OR projector to display photographs on screen, pencils, paper Working: independently
This activity uses A4 printouts of photographs from the collection. If printing the photographs is not possible, the activity can also be delivered as a whole class using a projector, looking at one photograph together.
1. Lay out a selection of photographs from Autograph's collection on a table and invite the class to individually pick a photograph that they are drawn to.
Printouts of photographs from Autograph's collection
2. Ask students to write down how the photograph they have chosen makes them feel.
Get them to think about:
How does it make you feel? (Physical: heart rate, breathing, muscles, skin).
What does it make you think of? (Psychological: memories, likes/ dislikes, hopes/fears).
How does it relate to your life? (Political: how might the images relate to backgrounds, beliefs, culture).
Student responding to a photograph
3. Now ask each student to swap photographs with another person on their table and write down how that photograph makes them feel.
4. After they have written down responses for two photographs, get them to compare and contrast their notes with the other students.
They could discuss:
How is your response similar to your partner and how does it differ?
Why do you think you have responded that way?
What have you learnt about your partner through this process?
5. Come back together as a whole class and invite students to share what they discussed with the group. Highlight how one photograph can be interpreted very differently depending on who is looking at it.
Reading photographs: fact vs fiction
In this section of the resource, students are invited to look more closely and analyse photographs to discover what they can tell us.
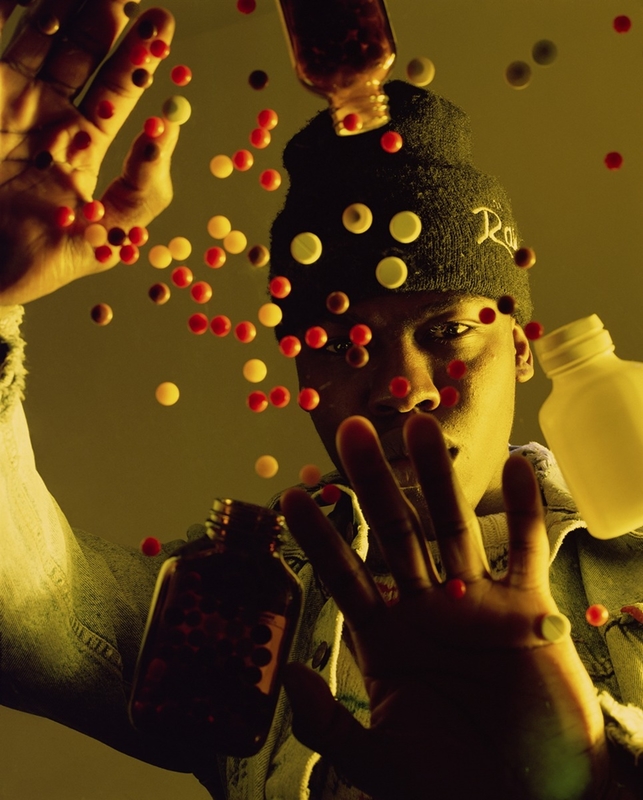
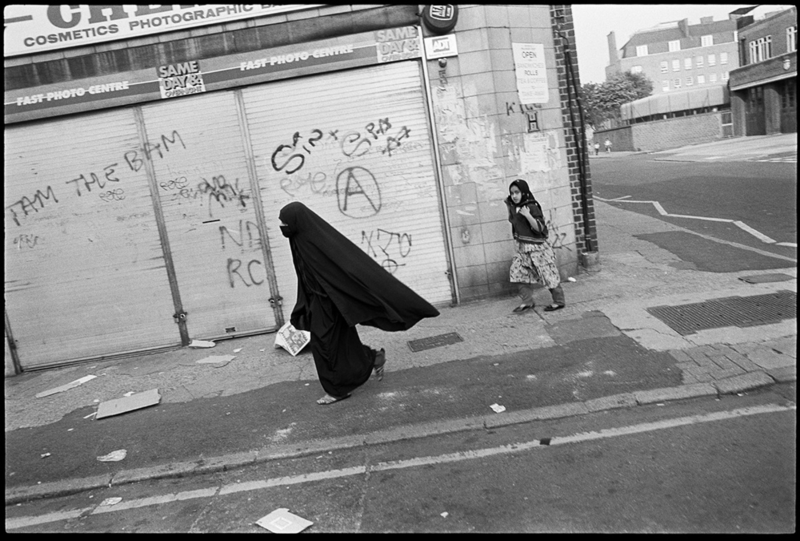
Use photographs from the selection in the carousel below for these activities, or choose your own photographs from Autograph's collection.
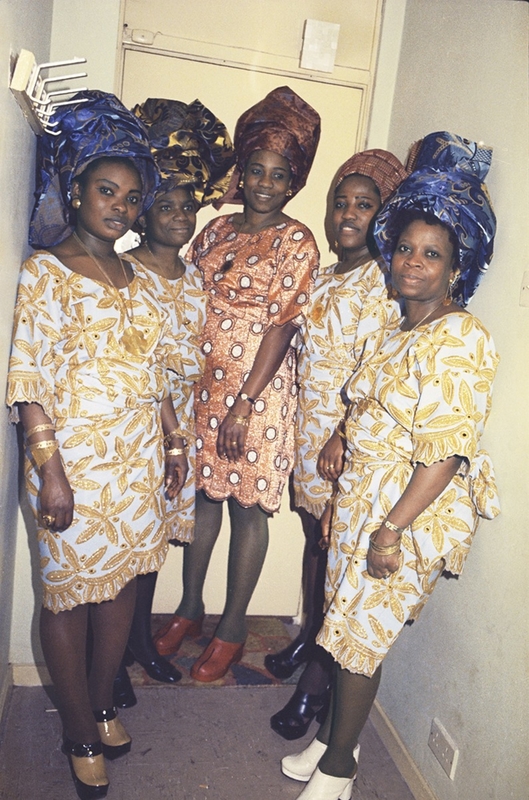
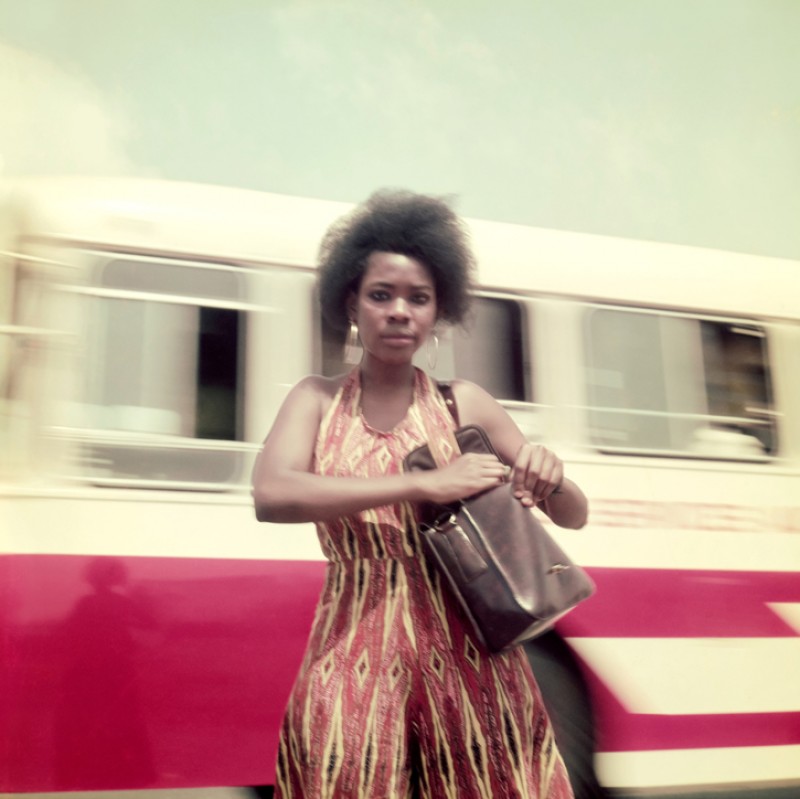
From the Series 'East End Portraits' 1950–1980
Bandele 'Tex' Ajetunmobi (1921–1994)
From the Series 'East End Portraits' 1950–1980
Bandele 'Tex' Ajetunmobi (1921–1994)
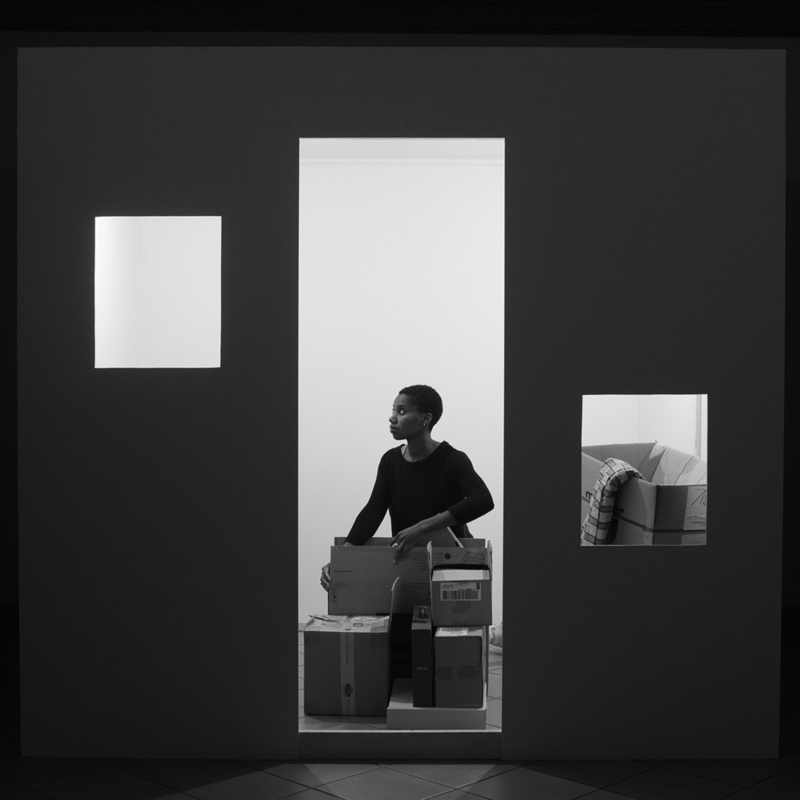
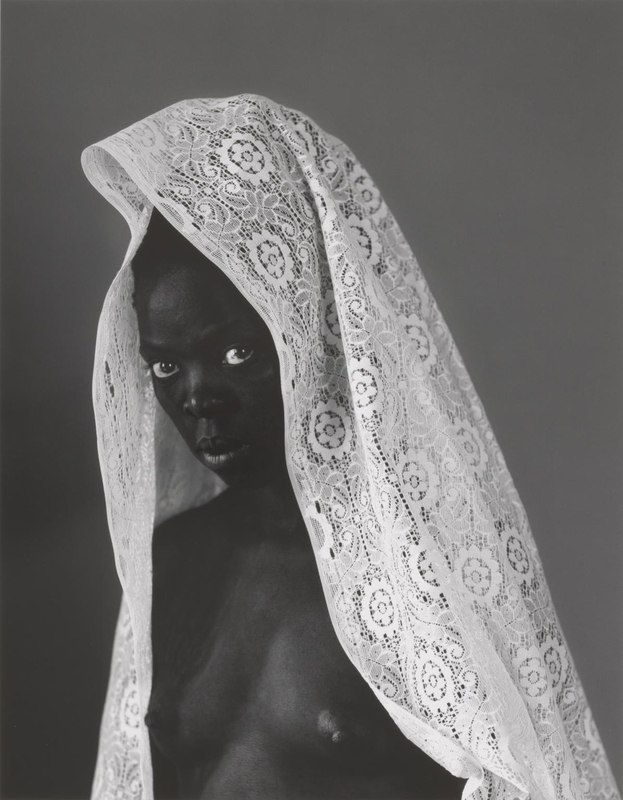
From the Series 'Neither Could Exist Alone' 2020
Silvia Rosi (b.1992)
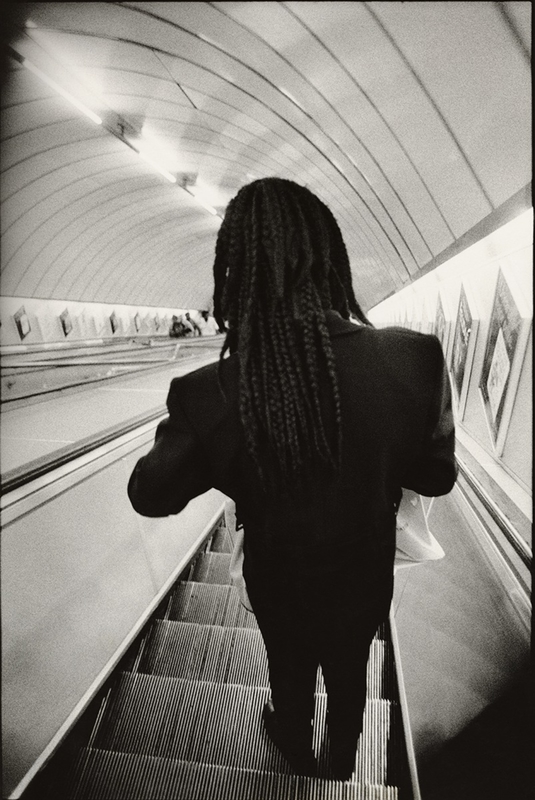
From the Series 'Lambeth and Brixton Tube' 1994
Armet Francis (b.1945)
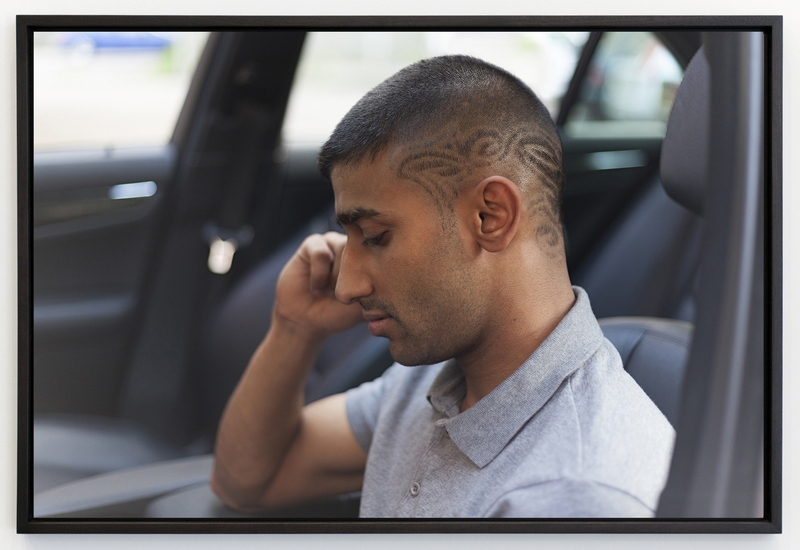
From the Series 'Digital Clouds Don't Carry Rain' 2021
Mónica Alcázar-Duarte (b.1977)
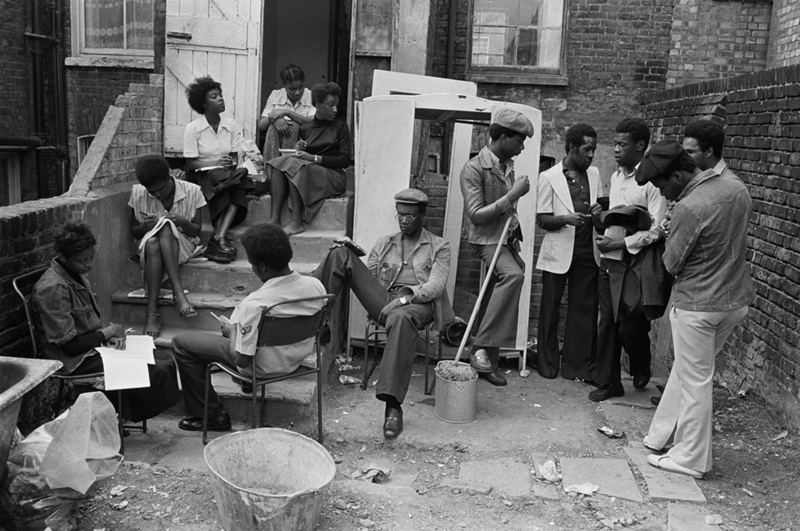
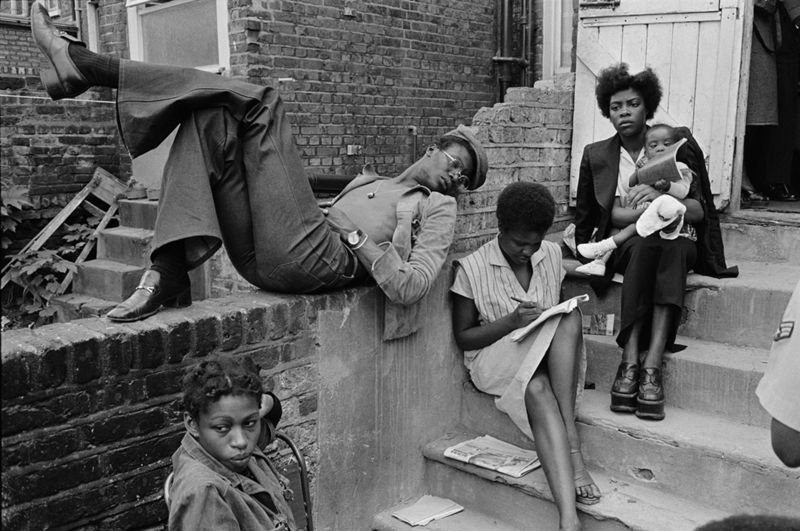
From the Series 'The Black House' 1973–1976
Colin Jones (1936–2021)
From the Series 'Black Youth and Mental Health' 1991
Dave Lewis (b.1962)
The Anti-Anti-Mugging March, London 1977
Syd Shelton (b.1947)
Absence 2020
Othello De'Souza Hartley (b.1977)
Nothing to Lose I 1989
Rotimi Fani-Kayode (1955–1989)
Class discussion: analysing photographs and what they tell us
Time: 10 minutes Materials: projector, a photograph from Autograph's collection (selection below) Working: as a class
1. Choose one photograph from the carousel above and display it on the projector.
Top tip: try turning out the light to focus attention on the photograph.
2. Ask the class:
what do we know to be a fact about this image?
remind students that the facts must not be assumed and should be a literal description of what is in the frame.
Student activity: analysing photographs facts vs. fiction
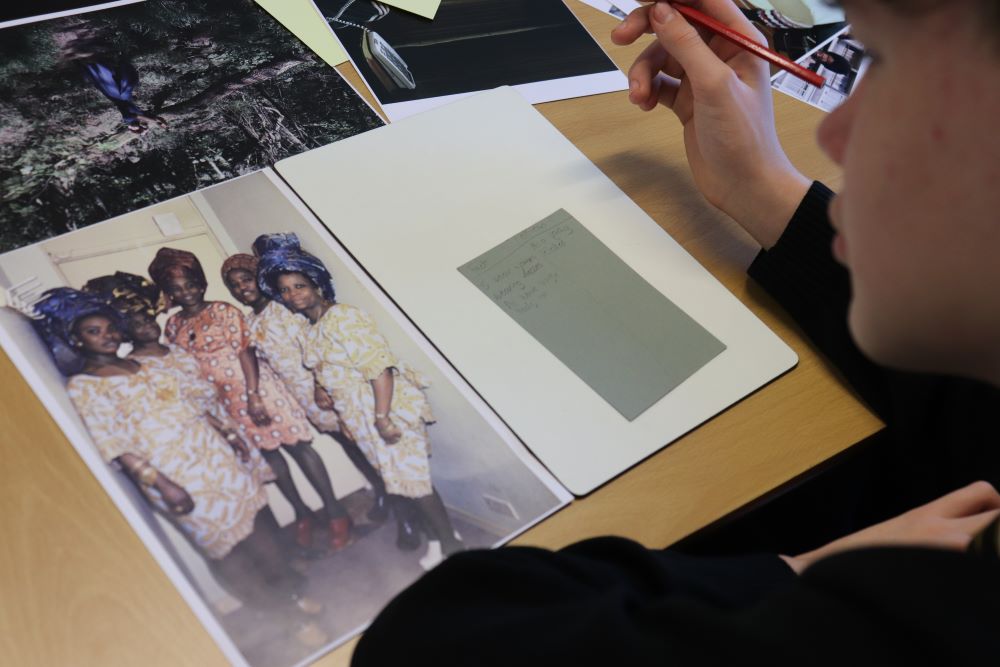
Time: 15 minutes Materials: a photograph from Autograph's collection, pencil, paper Working: independently
Now that students have explored the possible facts and fiction in a photograph as a group, task them with doing the same activity working independently. Print out a selection of photographs from Autograph's collection for students to choose from. (If you don't have access to a printer you could select a photograph and display this on a screen.)
1. Invite students to choose a photograph from the selection (or to look at the photograph on the screen).
2. Ask students to make two columns on their paper and to write 'fact' at the top of one column and 'fiction' at the top of the other.
3. Get them to look closely at their photograph and to write down the things that they might know for certain and things they assume.
Analysing a photograph, fact vs fiction
4. After 10 minutes invite two or three students to read out their findings. Ask the class: do they agree with their facts or do they need to be interrogated?
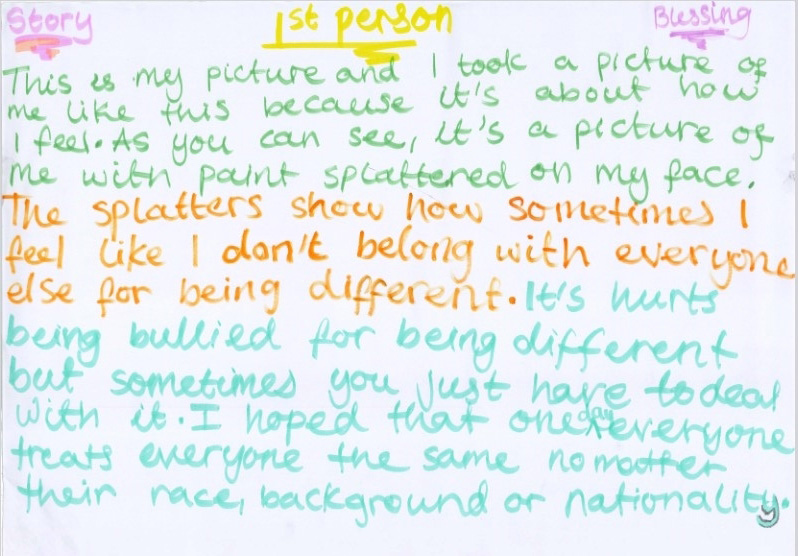
Student activity: write a story inspired by a photograph
Time: 20 minutes Materials: a photograph from Autograph's collection, pencil, paper Working: independently
Using the findings from the 'analysing photographs' exercise, ask students to create a story about their photograph.
These nudge questions might help to get them started:
where are the people from?
what is their relationship with one another?
where do they live?
what does their fashion tell us?
how old are they?
what year is it?
what kind of cultural community might they belong to?
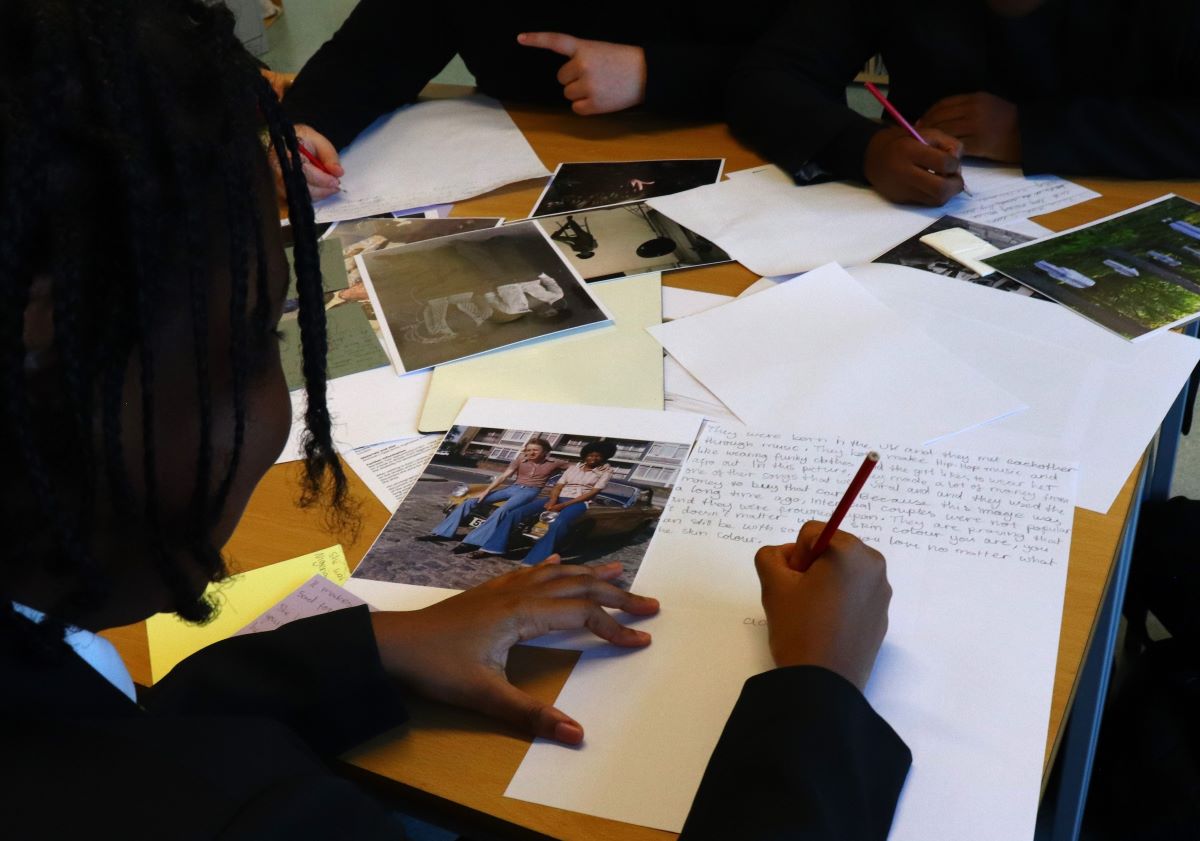
A story written by a student in response to a photograph
Discover the stories behind the photographs
Discover the stories behind the photographs you have explored in this resource. Use the links below to visit the artists' pages on Art UK, find out more about the artists and explore their work.
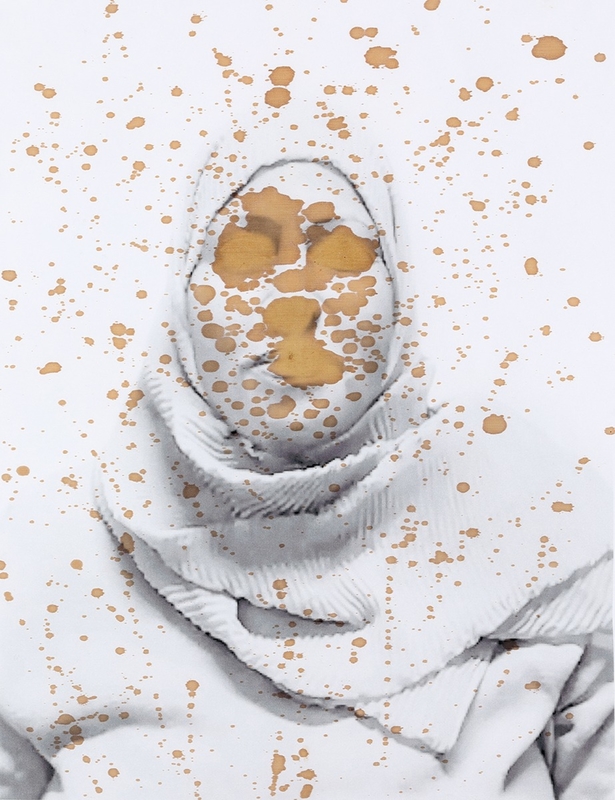
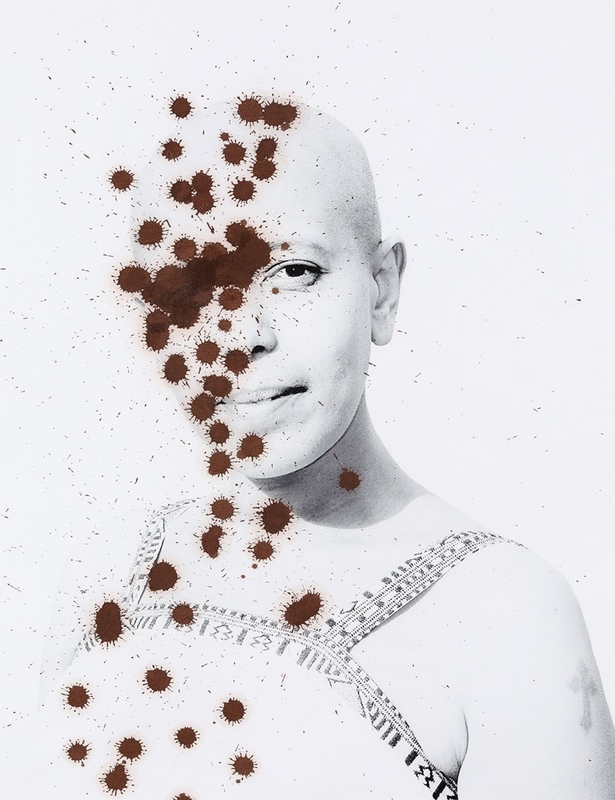
Aida Silvestri (b. Eritrea) is a visual artist who creates mixed media artworks that challenge the status quo of stigma, prejudice and social injustice highlighting issues of race, class, identity and health. Her practice is multi-layered and often combines text, images and experimental techniques to manipulate the photographic surface.
Anthony Lam (b. Hong Kong) is a photographic artist whose work addresses themes of identity, culture and place. During the 1980s and early 1990s, Lam worked with the Bangladeshi community in East London, first as a youth worker and then as a photographer.
Armet Francis (b. Jamaica) is best known for his social documentary, advertising and fashion photography. Throughout his career, his mission has been to document the African diaspora capturing the essence of black identity all over the world.
Bandele 'Tex' Ajetunmobi (b. Jamaica) was a self-taught photographer who stowed away on a boat to Britain from Lagos, Nigeria in 1947. After settling in East London, he began recording the daily lives of his friends and acquaintances, on the streets and in the pubs, shops and clubs. His photographs are an important historical document of life in the East End of London.
Colin Jones (b. England) was a ballet dancer turned documentary photographer and photojournalist. He is best known for his series of photographs taken in a hostel in Islington, London from 1973 to 1976. The hostel known as 'The Black House' was a government-funded local community initiative which provided support and housing for young Black people.
Dinu Li (b. Hong Kong) is an artist working with photography, moving image, sculpture and performance. Through his work, he explores themes of culture and migration. His portrait series Press The * then Say Hello from 2006 depicts people in high street internet phone shops in Manchester making phone calls to their family and friends abroad.
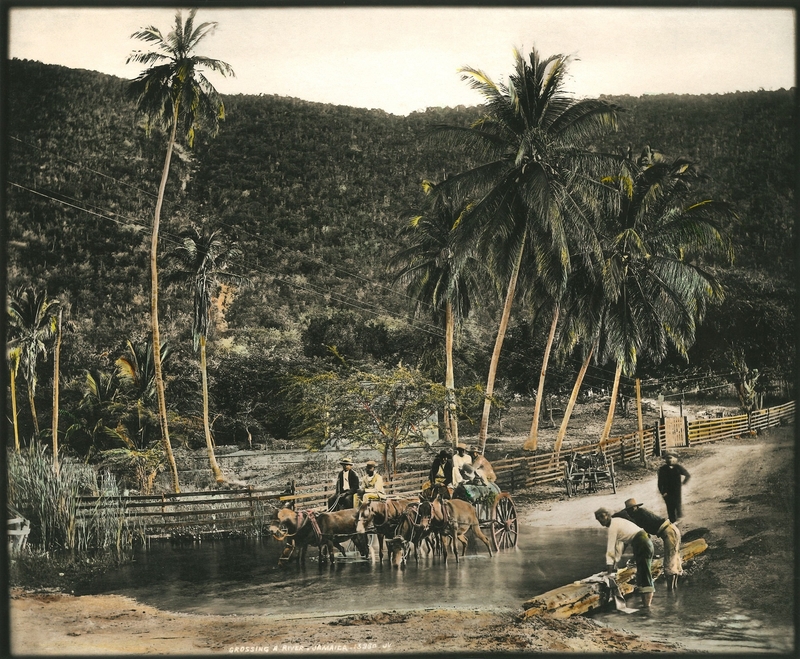
Ingrid Pollard (b. Guyana) is a photographer whose work looks at themes of history, landscape and environment, race and aspects of Britishness. Pollard is interested in interrogating the histories of photography and uses a wide range of techniques in her work including photography and alternative photographic processes, printmaking, text, video and audio. In her series The Valentine Days from 2017, Pollard hand-tinted large prints of postcards of Jamaica from the 1890s.
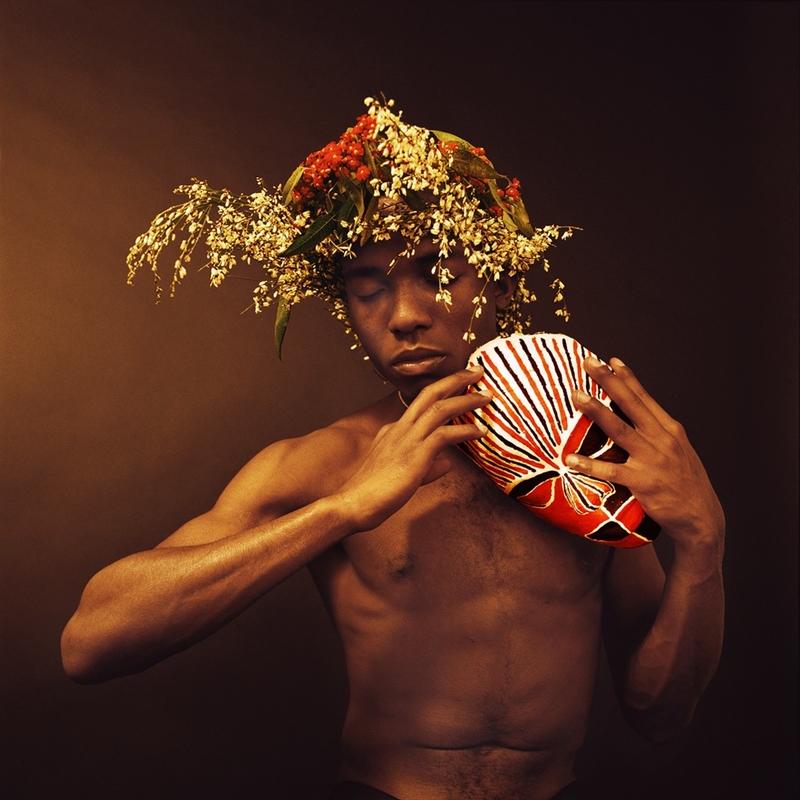
Jeannette Ehlers (b. Denmark) addresses themes of memory, race and colonialism in her work. Experimental in nature, her practice uses photography, video, installation, sculpture and performance. In her series of photographs, We're Magic. We're Real (From Sunset to Sunrise),made between 2021 and 2022, Ehlers examines hair as an important marker of Pan-African identity and connectedness.
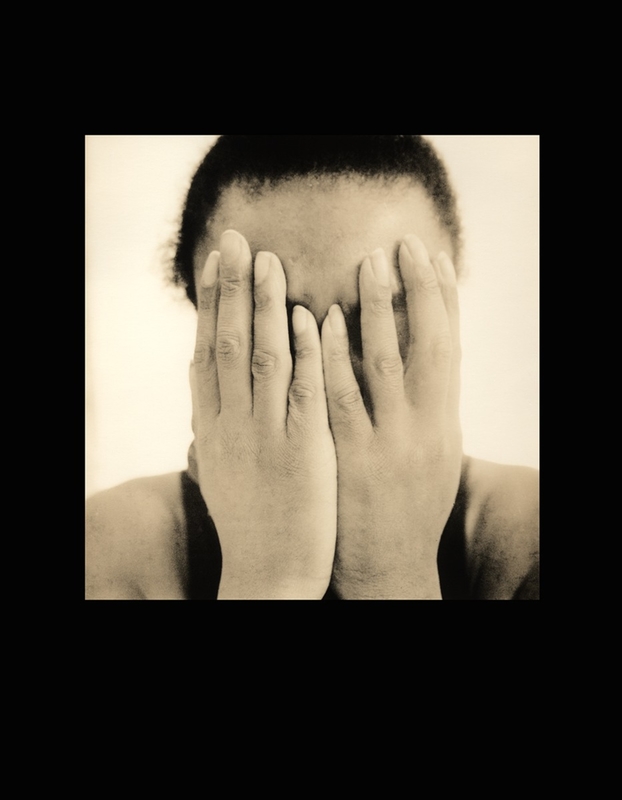
Joy Gregory (b. England) is a photographer whose work looks at social and political issues, through references to history and cultural differences in contemporary society. She is celebrated for her work on self-identity and engages with ideas around blackness, femininity and beauty. In her series of nine self-portraits, Joy Gregory depicts fragments of her upper body, face and hands, playfully moving in and out of the frame.
Mónica Alcázar-Duarte (b. Mexico) uses new technologies to highlight racial equality and ecological justice. Exploring ideas around climate, indigenous knowledge and western botany systems, her series Digital Clouds Don't Carry Rain is set amongst the dying trees of Derbyshire – the home of the Industrial Revolution.
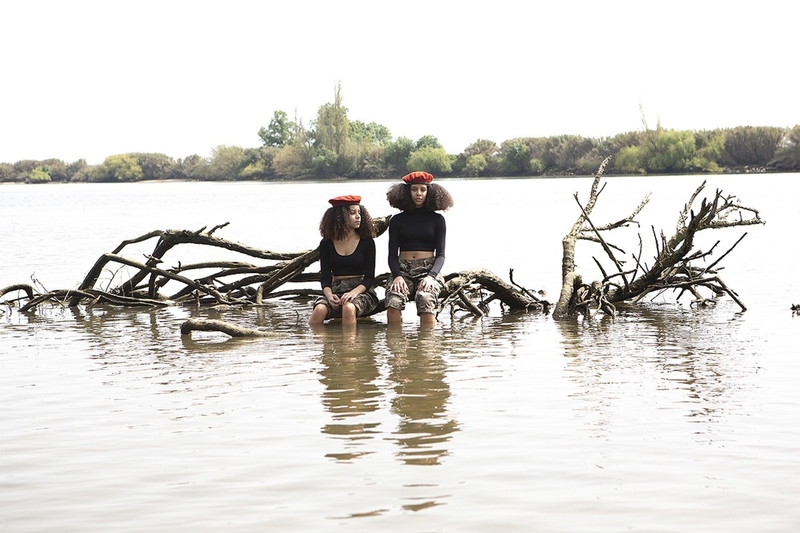
Mónica de Miranda (b. Portugal) is a visual artist, photographer and filmmaker. In her work, she contemplates the complex experiences of Afrodiasporic lives and Europe's colonial past. Using fact and fiction, her photographic series The Island explores a long trajectory of Black presence in Portugal by bringing together intertwined narratives – drawing on African liberation movements, migratory experiences, and identity formations through a Black feminist lens.
Silvia Rosi (b. Italy) works with photography, text and moving image to explore ideas of memory, migration and diaspora. Her series Neither Could Exist Alone, responds to the wider contexts of the COVID-19 pandemic and was created during the global lockdown in 2020. Using photography and film, the work explores ideas of isolation and the sense of fear that manifested through the continued lack of human interactions during the pandemic.
Syd Shelton (b. England) is best known for documenting Rock Against Racism (RAR). Between 1976 and 1981, the RAR movement confronted racist ideology in the streets, parks and town halls of Britain. It was formed by a collective of musicians and political activists to fight racism and fascism through music. Under the slogan 'Love Music, Hate Racism', it showcased reggae and punk bands on the same stage, attracting large multicultural audiences.